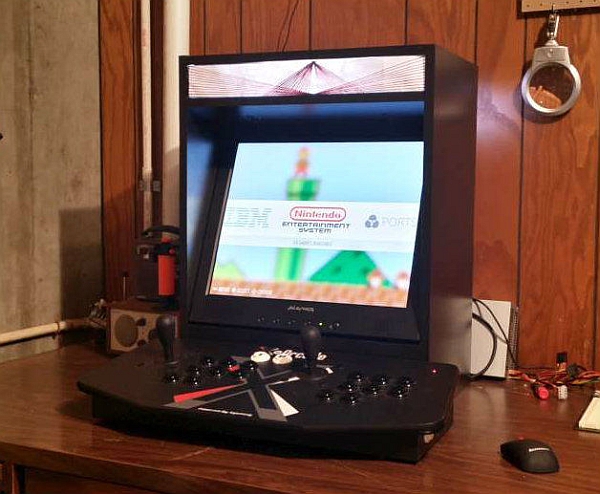
I was browsing Instructables when i came across rbates4 and his Raspberry Pi powered arcade machine. http://www.instructables.com/id/Build-your-own-Min…
I figured hey I have a spare DVI monitor, an X-arcade
stick and a desire to tinker with the Raspberry Pi microcomputer. I am going to have to build an arcade machine. Unfortunately I do not have access to a whiz bang fancy laser cutter, or anything larger then hand tools so the little acrylic or light ply machines are right out. To appease Mrs. TinkerGNome, The arcade machine needed to be smaller than a full size cabinet but large enough for 2 players due to the width of the control stick. Those requirements and the availability of preexisting parts the format was either a cocktail or a bar top. I went with a bar top cabinet as it could be portable if we so desired, and it can be put up out of the way.
My love of arcade machines started when I was a small child of about 4 or 5. I was playing a new “Joust” machine at Ron’s Roller Rink circa 1982. As I was 4 I can’t remember the specifics however I was apparently very good. My mother states that I had the highest score that anyone had ever seen and that I turned that one quarter into several hours of entertainment. I just remember the owner of the roller rink giving me a pair of blue roller-skates. Apparently he felt bad about turning off the machine as they were closing. It is time to pass these classics on to Arthur. That and I am still mourning the Asteroids machine my exwife made me get rid of.
Components pulled from my spare parts shelves
· 19″ LCD monitor (recapped and missing power supply)
· X-arcade Joystick
· ATX power supply
· D-Link DWL 801+ wireless bridge
· 2 Speakers
· Negative scanner light assembly
· Misc. bits and pieces.
Stuff I needed to buy
· Purchased 4x melamine shelves $5 each from Menards
· 8x 2 inch right angle brackets + screws $2 a 2 pack from Menards
· 4x 3 inch right angle brackets + screws $3 a 2 pack from Menards
· Hole saw kit $9 Harborfreight
· Raspberry Pi B+ $40 Amazon
· 3w 2 channel amplifier $5 Sainsmart
· HDMI cable 1.5ft. $2 Monoprice
· HDMI to DVI adapter $3 Monoprice
Tools used in no particular order: Handsaw, Philips screwdrivers, Dremel, Ruler, soldering Iron & gun, de-soldering braid, solder, zip ties, staple gun, drill, ruler, tape measure, multi-meter, wire cutters, crimpers, knife, “Gorilla Glue”, hole saw kit, drill bits, “Sharpie” marker, vacuum cleaner, Straight edge, tape measure, & an angle finder.
Now for my standard disclaimer WARNING ELECTRICITY, SHARP OBJECTS, DO THIS AT YOUR OWN RISK: If you drill into your leg (table, hand, arm, etc…) or shock/electrocute yourself, burn down your house (shop, dog, garage, etc…) or make something that forces the wife to blow a gasket, I cannot be liable as there is inherent risk in life.
On to Step 1, Planning layout and fix that monitor.
Step 1: Planning layout and converting the monitor for the ATX powersupply
I used a 19” 4:3 planar monitor specifically because about 10 years ago the company I work for bought several hundred to replace power hungry CRTs. About 2 years ago they are started to fail, when they fail our policy is to replace and recycle the failed monitor. That is exactly what I did replaced it with a new one and pulled it aside to “recycle it” into an arcade machine. (with permission cause stealing is bad)
This particular monitor had one bad capacitor that was leaking and was missing its power supply there was a post it stating that the VGA side was bad but there was nothing noted on the DVI side…Unfortunately I did not get a picture of recapping the monitor controller as I only have 2 hands. I am of the belief that all of our problems with electronic components have to do with capacitors. They leak then the thing just starts acting odd.
As the power supply with this monitor had that burnt out smell. I obtained a known working one to find out the pin outs. The 2 towards the front wound up being ground, and the 2 towards the back are +12v. Hey and may as well check out the monitor to ensure that I am not wasting my time. it at least powered on so bully for me.
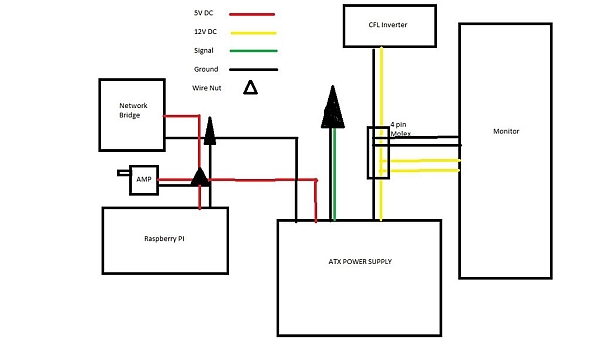
To maintain the modular nature of its power and as my PSU was a standard ATX computer power supply. As luck would behold I found a old CPU 4 pin Molex cable. This particular cable was to provide additional 12v power to the CPU, back when the P4 was the brand new processor. Now it is going to provide 12v to my monitor.
I clipped off the 2×2 end resulted in 4 wires that needed to be turned into pins. I tried jamming the twisted wire into the sockets but it kept splaying out. I wound up using my soldering gun to tin the ends with solder to keep them from fraying.
I took a leap of faith jammed those into the socket, hooked my bench top power supply up kept the fire extinguisher handy and Plugged the power supply in and used a yard stick to flip on my power strip …Hey no sparks and it works. Time to secure this kludge, I applied a generous glob of hot glue to help keep the wires from falling out of the socket, and provide a bit of electrical insulation.
The cabinet is all built around the monitor that you choose. Measure the outer dimensions of your monitor bezel and get a helper to have you figure out angles and positioning. My cabinet design uses as few cuts as possible to prevent refinishing the prefinished boards.
I used a piece of foam-core that I had laying around and sketched out a rough side template. I figured out an aesthetically pleasing height for the bottom edge of the monitor, whilst ensuring that it cleared the rear edge of controller assembly. The angle of tilt was chosen by what would look decent either seated or standing at bar height. Then I basically threw that design out the window but retained the angles found to lay out brackets in a 1:1 on the cabinet sides.
As you can tell the design of the side panels have been modified to a solid rectangle from the initial Jamma style cabinet design however the dimensions remained roughly the same.
Now onto step 2 building a case around the monitor…
Step 2: Building the cabinet
What makes an arcade game?
People have been playing video games at home for almost 40 years. However the feeling of a MDF cabinet with the lights and sounds of these machines just cannot be compared to. So I offer that it is the housing and controls that make an arcade game. OK enough of the old guy reminiscing here I am going to show you how I built my cabinet.
The first step I did was to take measurements of the two largest components, the joystick and the monitor. Cramming a Pi and a PSU into a box is the easy part. Adjusting a fixed monitor is just hard as it would require complete disassembly and possibly replacing wooden parts. .
I then sketched out a couple designs of Jamma style machines and even a few “candy cade” machines but the availability of prefinished melamine shelves that were large enough to facilitate this build steered my design to a cross of a Vectrex and a Nintendo cabinet.
From my measurements I needed the bottom edge of the monitor at least 5 inches higher than the table to clear the Tankstick. I was lucky in that the monitor chosen was completely rectangular with no rounded edges. So I could reuse the bezel. Measuring width I needed 17¼” inches.
To keep the number of cuts to a minimum the side panels were going to remain 12” deep by 24” tall. And to give a 35* slant to the monitor I needed a panel about 7” wide for the speaker shelf/bottom of the marquee.
I used 4 pre finished melamine shelves measuring 12”x24”:
one shelf was cut to a width of 12”x17¼ ” for the top, and the last was initially cut down to 12×17¼” to establish width then cut lengthwise to 5×17¼” for the “kick plate”, and 7×17 ¼ for the speaker shelf.
Unfortunately I goofed on my calculations and what was to be a 4” marquee opening has been reduced to a little over 2”. However that will not stop me and I think the finished piece reflects that. Like Bob Ross used to say “See that mistake, lets make it a tree. A happy little tree.”
Assembly consisted of positioning the boards and marking the side panels with where the boundaries of the kick plate monitor and speaker shelf were to be mounted. I then drilled pilot holes using a Dremel tool and a 3/16” bit ½” deep, placing brackets in position, securing with the provided screws.
After the speaker shelf and kick plate are mounted to the side panels, ensure that the cabinet is square and lay it on the front facing side. From the rear I then positioned the monitor into place to secure it with 3 inch brackets. The monitor rests on its bottom bezel edge with the top pressing against the speaker shelf. The brackets maintain pressure and prevent it from falling out.
I placed the 2 speakers on the shelf to mark where I was going to drill my holes for the sound to pass through and drilled 5 3/4″ holes in a X pattern similar to a die.
The bottom and back is unfinished MDF that I salvaged from a dumpster cut to 17¼“ x 22½“ (back) and 17¼” x 10½” for the bottom. The bottom is secured with 2 inch brackets and the back will be held on with 2 inch brackets and Magnets pulled from Hard disk drives.
The top will be secured last with 3 inch brackets after the speakers, audio amplifier, marquee, and light are installed.
I used a hole saw to drill a hole for the arcade stick connector and another one in the back panel to pass through the power cable for the PSU
Now on to the power supply and network adapter
Step 3: Getting it all powered up.
MORE POWA!!!
I am going to basically rehash my previous build for converting and using an ATX power supply. I wanted as few external wires as possible, with a a PC power supply I can satisfy all the power requirements and only have one power cable leaving the cabinet. The other requirement was that everything has to be modular, I am going to use as many existing connectors as possible and when a connector does not exist I will use either a JST or a Molex


