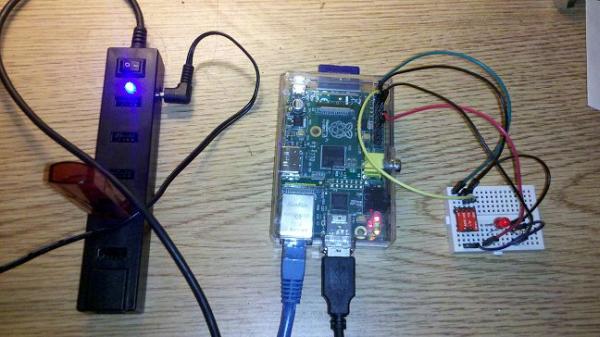
Here are the instructions to build a simple termperature logger using a $5.00 I2C temperature sensor. The data is stored to the SD card and can be easily imported into excel. Simply by changing or adding other sensors other types of data can also be collected.
The following components are used for this project:
Raspberry Pi (single board computer)
Temperature Sensor (SF-SEN-09418)
Solderless Breadboard
Hookup Wires
The Zagros Raspberry Pi starter kit also includes everything needed for this project except the temperature sensor!
Step 1: Wire up the Temperature Sensor
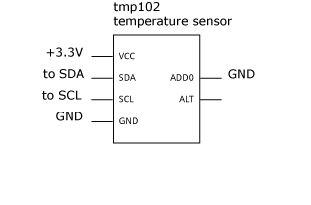
Make the following connections to the Raspberry Pi GPIO port. The ADD0 connection to ground determines the device I2C address. More than one sensor can be connected to the I2C bus, but they must each have a unique address.
Sensor RPi GPIO
VCC +3.3V
SDA SDA
SCL SCL
GND GND
ADD0 GND (note this sets the I2C device address)
ALT N/C
NOTE: DO NOT CONNECT THE SENSOR VCC TO +5VDC, THIS WILL DAMANGE THE SENSOR
Step 2: Enable the I2C Bus
First the I2C bus must be enabled. By default the bus is disabled. To do this, edit the configuration file /etc/modprobe.d/raspi-blacklist.conf
Use the command:
sudo nano /etc/modprobe.d/raspi-blacklist.conf
Now change the file contents from:
# blacklist spi and i2c by default (many users don't need them)
blacklist spi-bcm2708
blacklist i2c-bcm2708
To this:
# blacklist spi and i2c by default (many users don't need them)
blacklist spi-bcm2708
#blacklist i2c-bcm2708
Step 3: Set I2C Module to Load at Boot
The I2C module should be set to load when the Raspberry Pi starts up. Do this by editing the /etc/modules file.
The following command can be used to edit this file:
sudo nano /etc/modules
Add the following line to the end of the file:
i2c-dev
Step 4: Install I2C packages
Install the i2c-tools and python-smbus packages to complete the I2C setup:
For more detail: Raspberry Pi Temperature Logger


