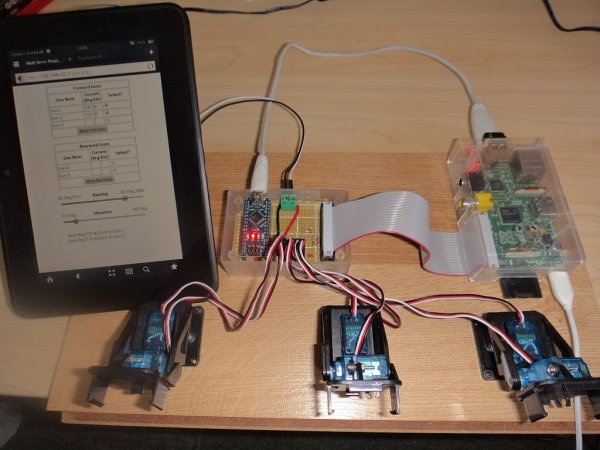
This is a small project I did for a colleague who is building a 1/48 scale RC model of a Fletcher class Destroyer (yup…that makes the “model” about 8 feet long!) He asked if I could animate the 5 x MKIII 5″/38 gun turrets, complete with bearing and elevation, and also being able to individually control them, or control them in selectable groups, as per the real thing.
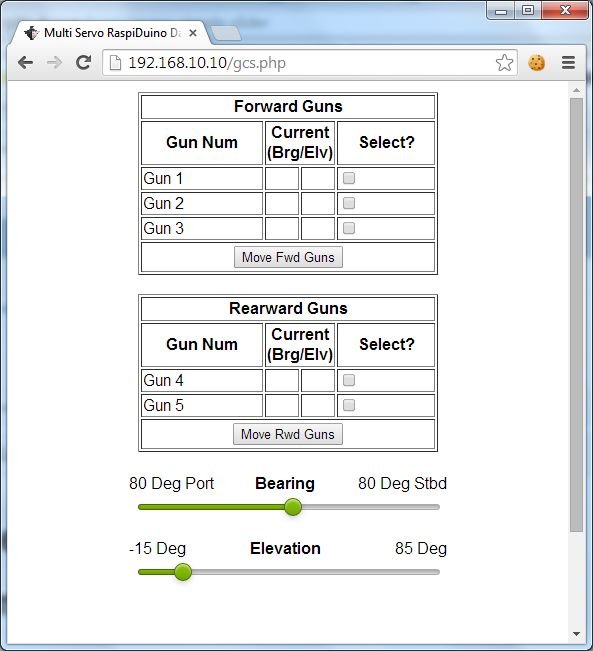
So after 3 days of researching, testing and fine tuning, I have: 1 x Raspberry Pi (B), running as a WAP + apache, php, python + CGI support 1 x Arduino Nano, receiving data from the Raspberry serial comms pins, 3 x pan/tilt units that represent the 3 fwd turrets 1 x web interface where I can set the bearing and elevation of any chosen gun (or guns) and a “go” button …and using my Kindle to control them.
I'm passing the gun number, bearing and elevation as GET request variables, using a python CGI script to get those variables and send them to the arduino.
The video shows the servos moving at full speed, but I have since changed from the servo.h arduino library to the VarSpeedServo.h library and can set the speed to something a bit more realistic. It also makes the servos appear to move together rather than sequentially.
I've also (since the video) made up a proper circuit board to accommodate a 26 pin socket for the Raspberry ribbon cable, a basic voltage divider for a logic level converter, headers for plugging the nano into and header pins for the servo connections. It also appears to have cleaned up a lot of the servo jitter I was getting.
[Edit] – Due to popular demand…(both of them)…I have now written a more complete instructable…so here we go
Step 1: Things you'll need…
- Raspberry Pi (Rev B) with 4-8Gb SD Card and micro USB cable.
- USB WIFI dongle – Something like the Edimax EW-7811Un 150 Mbps Wireless 11n, but try and get one using the RealTek or Atheros chipsets. It's less likely you will have driver problems…they also play nice with Linux and the aircrack suite 😉
- A number of servos – This project used 6 x TowerPro 9g micro servos.
- Arduino Nano
- 3 x Pan/Tilt servo mount (about $4 each off ebay.)
- 1 x 3.3k and 1 x 1.6k 1/4 watt resistor – These are to make up the voltage divider for the logic level converter
If you make up a proto board for the nano, Raspberry connector header and servo headers, you'll also need:
- 26 pin double row (2 x 13) female/female ribbon cable,
- 26 pin (2 x 13) pin male header,
- 2 x 10 pin stackable female headers (for the nano to plug into),
- A 2 terminal screw connector block.
- Enough standard header pins for the number of servos. In my case, 3 rows of 6 pins arranged in an 18 pin block.
Step 2: Setting up a RaspberryPi as a WAP, web server and jQuery Simple Slider support..
I used putty to telnet into the Raspberry from my laptop via a cat5 cable, and then joined the Raspberry to my home wifi for updating and downloading the dependencies.
Install all the packages required to run a web server on the Raspberry..see here for a good guide:
Make sure you have java SE Runtime installed on the Pi…
- On the Pi terminal, type “java -showversion”, and you should get some nice output about Java SE Runtime and version numbers
Update your raspberry:
- “sudo apt-get update”,
- “sudo apt-get upgrade”
- Reboot, then log back in once it has booted
Change directory to /var/www/
Use “wget” to grab the jQuery Simple Slider from http://loopj.com/jquery-simple-slider/
“wget https://github.com/loopj/jquery-simple-slider/arc…
Unzip the file and you should have 2 new directories names “css” and “js”. One contains the cascading style sheets for the web pages, and the other has the main javascript files to make the sliders work.
Now..highlight all of the code in the file “gcs-php.txt”, rightclick and copy.
In the Pi telnet terninal, open a new file called “gcs.php”…or whatever you want to call it
- “sudo nano gcs.php”
Rightclick in the putty terminal window and the clipboard will immediately paste into the nano editor.
CTRL+O to save, CTRL+X to close nano
You also need the form handler cgi script to send the signals to the Nano..
Make a new directory in /usr/lib/ called “cgi-bin”
Open a new file called “gcs.py” (sudo nano /usr/lib/cgi-bin/gcs.py)
Copy and paste the code from gcs-py.txt into the nano editor, then save and close like we did above.
Make the file executable with “sudo chomd 777 /usr/lib/cgi-bin/gcs.py”
The one part that could trip you up here is the connection device. Do a “ls /dev/tty*” and see what is listed. Then connect your USB cable between the raspberry and the Nano, and all going well, you should see “ttyAMA0” (that's a zero..not an ‘oh'). If it shows something different, then change the python code to reflect the proper device number.
Step 3: More Apache stuff…
You now need to allow Apache2 to run python scripts…and here's how.
(http://www.linux.com/community/blogs/129-servers/757148-configuring-apache2-to-run-python-scripts)
Once all that is done you should be ready to go
On your computer, open a browser, and browse to http://[your Raspberry IP address]/gcs.php
If the browser complains it cannot find it:
Open a command prompt on your computer and try to ping your Pi “ping [pi IP address]” If you are successfully telnetting to it over putty, then there's something up with your browser settings such as a proxy. Don't ask me to help, I have no idea how your internet connection and browser is configured. Google is your friend.
Check to see that apache is running..
“pgrep apache”…should show a bunch of numbers, which is the process IDs (PIDs) for currently running apache processes, or
For more detail: Raspberry Web server sending GET data to Arduino Nano driving 6 servos


