Assalamualaikum, Hi.
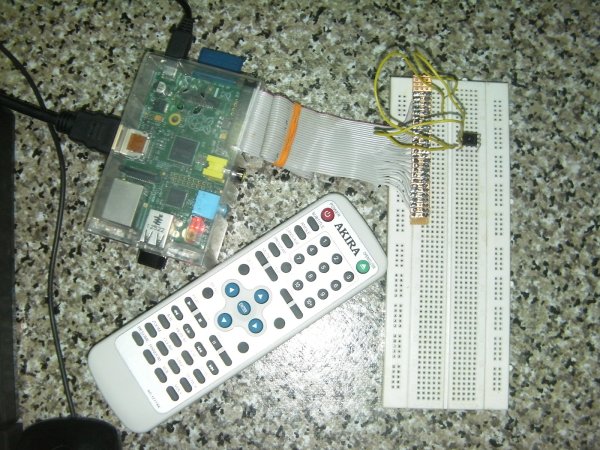
I would love to share my recent project, connecting an IR receiver to Raspberry Pi's GPIO.
Warning!
Playing around with Rpi's GPIO is dangerous if you didn't know what you're doing. I'll not hold any responsibility on any failure of your device while following my guide.
GPIO for Rev.1 Rpi's is different from Rev.2 which the one that I'm using. Failure to recognize the pin out of your Rpi's might causing damage to your Rpi's so proceed with caution.
GPIO ref.: http://elinux.org/RPi_Low-level_peripherals#General_Purpose_Input.2FOutput_.28GPIO.29
TLDR;
1. Raspberry Pi homemade expansion cable – Hard (relative to your soldering skill and availability of tools)
2. Setting the remote config file (lirc) – Easy
1. Raspberry Pi homemade expansion cable
Items needed:
Floppy cable, stripboard, single row male header
Floppy cable preparation
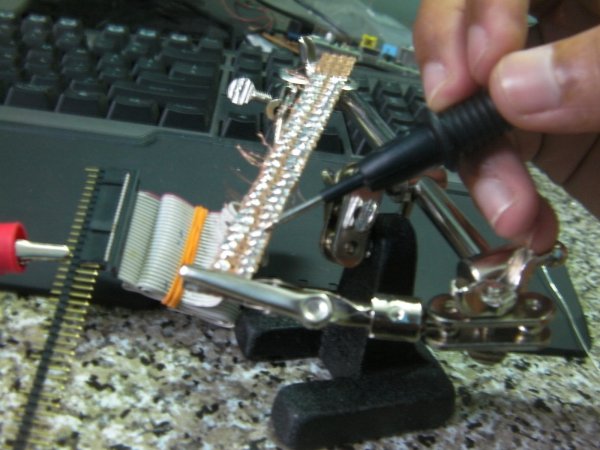
Since I've an unused floppy cable laying around, I converted it into Rpi's GPIO expansion cable.
If you need to fit the floppy header into a case such mine, you need to cut the header off, since the Rpi's GPIO is only 13×2. you can just use a normal cutter for this.
Cut off one end of the floppy cable, and strip the ends of each of the ribbon wire cables.
Stripboard preparation
Cut out a 26 pins wide stripboard. The length can be 2 and above, but I made it 3 pins wide. Make sure you cut it out on the correct side so that it will get 26 rows of connected copper strip!
Just some tips, if you don't have proper cutting tools, you can break them easily by sandwiching it in between a thigh gap such as a drawer gap.
Soldering
Solder the stripped ribbon cables into your stripboard cut-out at one end, and solder a 26 pin male header at the other end. You can get a row of 32 pin male header at Jalan Pasar for around RM1.
Testing
Before you start using it for your project, check each pins for open/close circuit with your multimeter.
If all pins are connected properly, you can proceed with your project!
2. Setting the remote config file (lirc)
You can buy a remote/IR receiver at Jalan Pasar for around RM5. They don't have a proper part number for that, but if you mentioned remote control receiver they might know it. But most likely they will show you the IR transmitter instead (because usually normal people will search for this to fix their remote), so you just mentioned to them that you need the one with three leg. I've bought two type of them just to be safe, but I've found out that both of them are supported for this project.
Connect the three pins to its respective pin 1, 6 and 12 as illustrated below.
Boot up your Rpi, and go into terminal via SSH or by escape key on XBMC exit.
To check that the receiver is working:
pi@raspbmc:~sudo modprobe lirc_rpi
pi@raspbmc:~sudo kill $(pidof lircd)
pi@raspbmc:~mode2 -d /dev/lirc0
Press any key of your remote control, you can see output on the terminal such:
pulse 168
space 4816
pulse 169
space 4784
pulse 1333
space 3638
Then Ctrl-C to stop the previous command and proceed with others step.
To fetch the list of remote key code to be entered in lirc configuration file:
pi@raspbmc:~sudo kill $(pidof lircd)
pi@raspbmc:~irrecord --list-namespace | grep KEY
Take note of these somewhere else so that you can easily copy and paste it when you're generating the config.
Start generating the config file:
pi@raspbmc:~sudo kill $(pidof lircd)
pi@raspbmc:~irrecord -d /dev/lirc0 ~/lircd.conf
Follow exactly each instruction given on the screen. If you missed any of those steps, you'll find out the key code is not listed in your config file. The key code you copy-paste earlier will be used in this step.
So in the end, check the generated config file at /home/pi/lircd.conf. You should see something like this:
# Please make this file available to others # by sending it to <[email protected]> # # this config file was automatically generated # using lirc-0.9.0-pre1(default) on Sat Dec 22 23:05:43 2012 # # contributed by # # brand: /home/pi/lircd.conf # model no. of remote control: # devices being controlled by this remote: # begin remote name /home/pi/lircd.conf bits 16 flags SPACE_ENC|CONST_LENGTH eps 30 aeps 100 header 9014 4495 one 563 1687 zero 563 548 ptrail 560 repeat 9013 2245 pre_data_bits 16 pre_data 0xEF10 gap 107922 toggle_bit_mask 0x0begin codes KEY_UP 0x02FD KEY_DOWN 0x827D KEY_LEFT 0xE01F KEY_RIGHT 0x609F KEY_ENTER 0x22DD KEY_MENU 0xD02F KEY_BACK 0x906F KEY_VOLUMEUP 0x40BF KEY_VOLUMEDOWN 0xC03F KEY_1 0x8877 KEY_2 0x48B7 KEY_3 0xC837 KEY_4 0x28D7 KEY_5 0xA857 KEY_6 0x6897 KEY_7 0xE817 KEY_8 0x18E7 KEY_9 0x9867 KEY_0 0x08F7 end codes end remote
If the line between ‘begin codes' and ‘end codes' is empty, you need to do the configuration again. So if you're unsure whether you follow the instruction correctly or not, don't register all of your remote key first, but try one or two key first. I find this lesson the hard way, so hopefully you, or future me don't repeat the same mistake again. 🙂
Now on Raspbmc, you need to setup the remote setting. Go to Programs>Raspbmc setting, navigate to IR Remote tab and select the option to enable GPIO IR Receiver.
For more detail: Remote receiver to Raspberry Pi via GPIO


 begin codes
KEY_UP 0x02FD
KEY_DOWN 0x827D
KEY_LEFT 0xE01F
KEY_RIGHT 0x609F
KEY_ENTER 0x22DD
KEY_MENU 0xD02F
KEY_BACK 0x906F
KEY_VOLUMEUP 0x40BF
KEY_VOLUMEDOWN 0xC03F
KEY_1 0x8877
KEY_2 0x48B7
KEY_3 0xC837
KEY_4 0x28D7
KEY_5 0xA857
KEY_6 0x6897
KEY_7 0xE817
KEY_8 0x18E7
KEY_9 0x9867
KEY_0 0x08F7
end codes
end remote