lcd

Raspberry Pi UPS HAT hits Kickstarter 1

Raspberry Pi UPS HAT hits Kickstarter

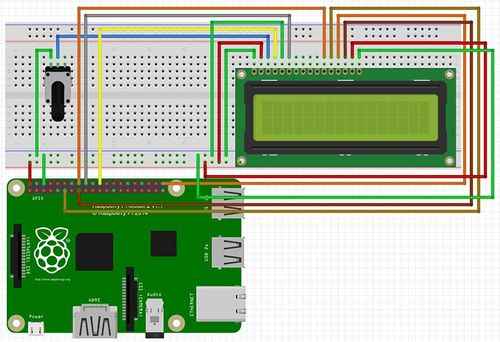
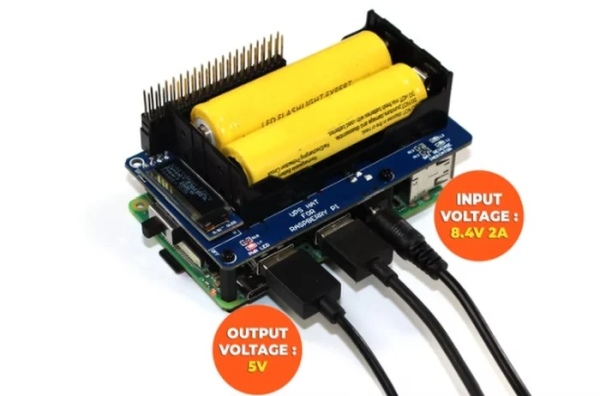
Amrit Singh based in London has created a new Raspberry Pi accessory in the form of a versatile uninterruptible power supply – UPS HAT offering a 5V operating voltage access to the GPIO Header, I2C Bus communication battery warning indicator and a handy LCD display. Raspberry Pi UPS HAT Early bird pledges are now available for the unique […]

Raspberry Pi UPS HAT hits Kickstarter Read More »

Top 5 Raspberry Pi Pico Kits

Top 5 Raspberry Pi Pico Kits

1. Freenove Ultimate Starter Kit for Raspberry Pi Pico (Contained) (Compatible with Arduino IDE), 587-Page Detailed Tutorials, 224 Items, 55 Projects, Python C Java Code Ram Memory Installed Size 264 KB Brand FREENOVE CPU Manufacturer Raspberry Pi Human Interface Input Buttons Color Ultimate Kit with Pico CPU Speed 133 MHz About this item 3 tutorials

Top 5 Raspberry Pi Pico Kits Read More »

ARCADE MACHINE PACK AND PLAY

ARCADE MACHINE PACK AND PLAY

There’s something about the large imposing wooden box of an arcade machine that lends a confident presence to a room. The problem with a tall and heavy box is that it takes up quite a bit of space and readily draws the eye. So [Alexandre Chappel] set out to avoid that and build an arcade machine

ARCADE MACHINE PACK AND PLAY Read More »

MYIR INTRODUCES 29 ARM SOM POWERED BY ST STM32MP1

MYIR INTRODUCES $29 ARM SOM POWERED BY ST STM32MP1

MYIR introduces a cost-effective MYC-YA157C CPU Module powered by ST’s STM32MP1 microprocessor which features dual-core Arm Cortex-A7 operating at up to 650MHz and an embedded Cortex-M4 core operating at up to 209MHz. The module is ready to run Linux OS and targets a wide variety of applications like industrial control, consumer electronics, smart home, medical and more other energy-efficient applications which require

MYIR INTRODUCES $29 ARM SOM POWERED BY ST STM32MP1 Read More »

Wire setup 1

LCD display + Raspberry Pi

Wire setup 1. Solder the 0.1″ header strip into the 16 pins of the LCD screen’s board 2. Connect the wires as shown above Pin 2 (VCC) and 6 (Ground) on raspberry pi to power and ground respectively On LCD pin 1 to ground, pin 2 to power, pin 3 to center of potentiometer, pin

LCD display + Raspberry Pi Read More »

Scroll to Top