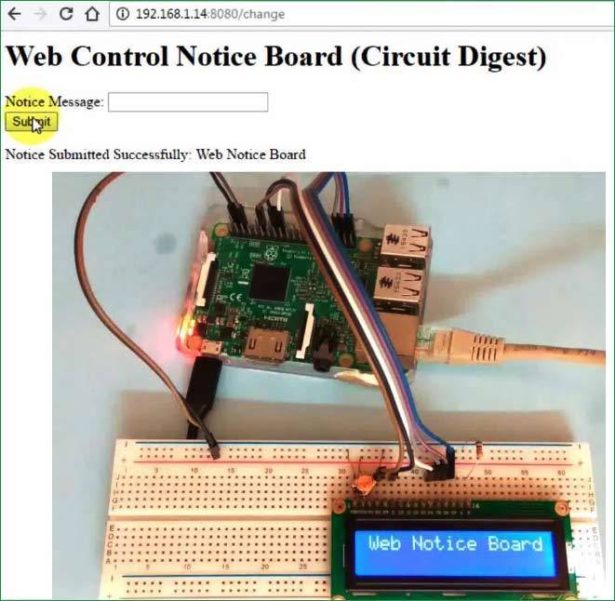
We all are familiar with the Wireless Notice Board as we have already built Wireless Notice Board using GSM and Arduino. But today we are going one step ahead and instead of using GSM as wireless medium, this time we are using Internet to wirelessly send the message from Web Browser to the LCD which is connected to Raspberry Pi. As message is sent through the web browser, so it can be sent using Computer, smart phone or tablet, so it will add one more project in our IoT projects collection.

In this Web Controlled Notice Board, we have created a local web server for demonstration, this can be a global server over internet. At the Raspberry Pi, we have used 16×2 LCD to display message and Flask for receiving the message over network. Whenever Raspberry receives any wireless message from Web browser, it displays on the LCD. We will discuss about these things in detail in this article.
Components Required:
- Raspberry Pi 3 (any model)
- Wi-Fi USB adapter (if not using Raspberry Pi 3)
- 16×2 LCD
- Bread Board
- Power cable for Raspberry Pi
- Connecting wires
- 10K Pot
Working Explanation and Creating the WebPage:
In this project, the main component is Raspberry Pi, which is the heart of this project and used to control the processes related to this project. Like: Driving LCD, receiving “Notice messages” from the server etc.
Here, we have created a web server, which provides a way to send “Notice Message” to Raspberry Pi using Flask in a web browser. The Flask is a microframework for Python. This tool is Unicode based having built-in development server and debugger, integrated unit testing support, support for secure cookies and its easy to use, these things make it useful for the hobbyist.
We have created a webpage with a TextBox and a Submit button, where we can enter our “Notice Message” in TextBox and then submit it to the server by clicking on Submit button. This web application is developed by using HTML language. The code of this web page is given below and very easy to understand.
<h1>Web Control Notice Board (Circuit Digest)</h1>
</div>

<div data-role="content">

<form method="post" action="change">
  <label for="slider-1">Notice Message:</label>
  <input type="text" name="lcd" id="lcd" />
  <br />

  <input type="submit" value="Submit" />
</form>

{% if value %}
<p>Notice Submitted Successfully: {{ value }}</p>
{% endif %}

</div>
User needs to copy-paste the above given HTML code in some text editor (notepad) and save the file with .HTML extension. Then put this HTML file in the same folder where you have put your Python Code file (given at the end) for this Web Controlled Notice Board. Now you can just run the Python code in Raspberry Pi, open the IP_address_of_your_Pi:8080 in web Browser (like 192.168.1.14:8080) and input the message and click submit, as soon as you submit the message, you will get the message on LCD connected to Raspberry Pi. Check the whole process in Demonstration Video at the end.
The webpage is created using HTML language, which contain a form having a textbox and submit button, with Heading (h1 tag) Web Control Notice Board. The form has “change” is the action that will be performed in code using post method, when we click on Submit button. The slider is block with label “Notice Message”.
After it, we can add an optional line to show the text which we have sent to the Raspberry Pi via the server.
{% if value %}
<p>Notice Submitted Successfully: {{ value }}</p>
{% endif %}
It checks the value in the text box and if there is some value in the textbox then it prints the text on webpage itself, so that user can also see the submitted message. Here ‘value’ is “input text or notice message” that we will type in slider box or text box.
Circuit Explanation:
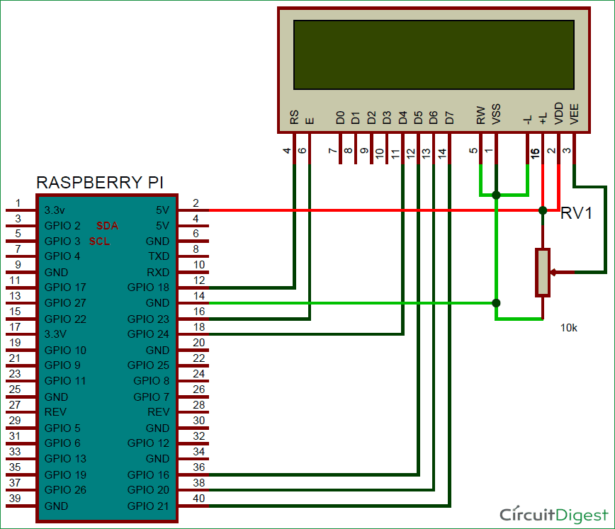
Connections for this Wireless Message Board are very easy; we only need to connect LCD with the Raspberry Pi board by using some connectors over bread board. The user may use zero PCB for connections. RS, RW and EN pins of LCD are directly connected to pin 18, GND and 23. And data pins of LCD D4, D5, D6, D7 are directly connected to Raspberry Pi’s GPIO 24, 16, 20, 21. A 10K pot is used to control the brightness of LCD.
For more detail: Web Controlled IoT Notice Board using Raspberry Pi


