This project takes you through all the steps required to get you RAK 831 Lora Gateway module up and running with wifi as the backhaul.
Story
Introduction
This step-by-step guide is aimed at developers who want to develop their very own lora gateway using the awesome RAK831 Lora radio front-end module from RAK Wireless. The Guide assumes basic knowledge of the Raspberry pi eco system, the hardware and the associated Debian OS. The Guide also assumes basic knowledge of the GPIO and peripherals present on the Raspberry Pi. SO Lets get started:
What is LoRA?
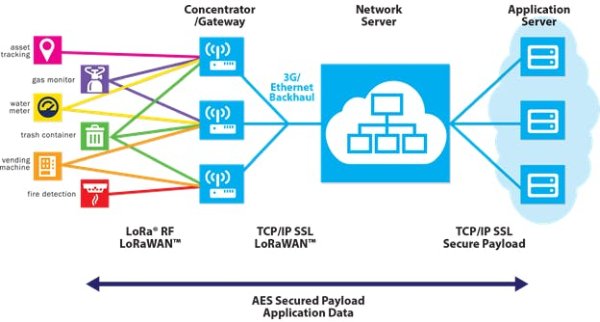
LoRa Alliance™ Technology. LoRaWAN™ is a Low Power Wide Area Network (LPWAN) specification intended for wireless battery operated Things in a regional, national or global network. LoRaWAN targets key requirements of Internet of Things such as secure bi-directional communication, mobility and localization services.
The Diagram above shows the various parts of the Lora wireless architecture. Some of the important parts are explained in short below:
Key Features of LoRa Technology and the LoRaWAN Protocol
· GEOLOCATION: Enables GPS-free, low power tracking applications
· LOW COST: Reduces costs three ways: infrastructure investment, operating expenses and end-node sensors
· STANDARDIZED: Improved global interoperability speeds adoption and roll out of LoRaWAN-based networks and IoT applications
· LOW POWER: Protocol designed specifically for low power consumption extending battery lifetime up to 20 years
· LONG RANGE: Single base station provides deep penetration in dense urban/indoor regions, plus connects rural areas up to 30 miles away
· SECURE: Embedded end-to-end AES128 encryption
· HIGH CAPACITY: Supports millions of messages per base station, ideal for public network operators serving many customers
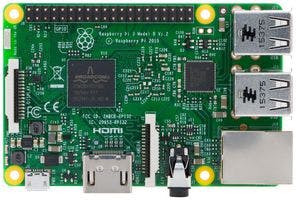
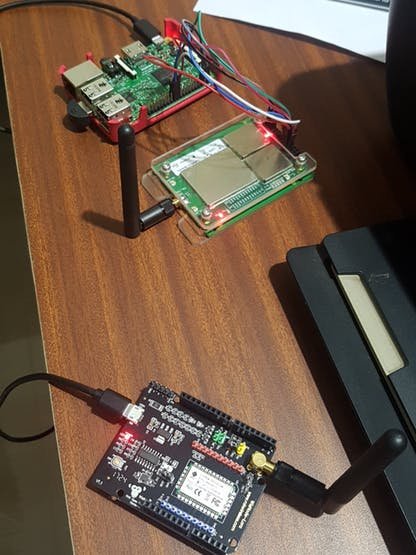
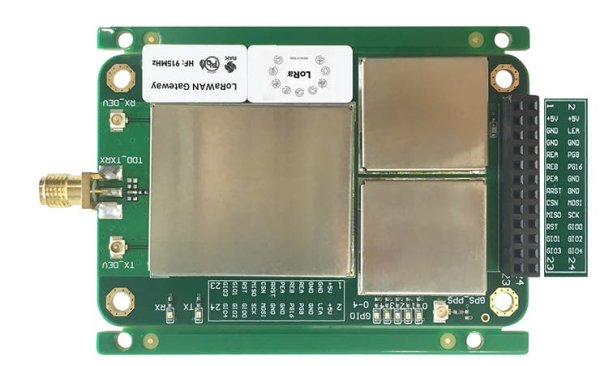
The RAK 831 is a LorA Radio frontend; i.e. it acts as a receiver of incoming lora data packets and forwards them to a aggregator management software/hardware host. It can also transmit LoRA data packets based on the host boards request. In our case a raspberry pi 3 is the host board controlling the RAK 831 frontend.
Choosing the backhaul
What is a backhaul? Backhaul refers to how the Raspberry Pi will be connected to the Internet.This guide focuses on using Wifi as backhaul, but you could also use Ethernet or 3G/4G. If you do have Ethernet available near the gateway, then prefer it over WiFi or 3G/4G. This is because having an additional radio signal inside the enclosure will cause noise. The software can handle the noisy environment, so it's not a big issue, but the less noisy, the better. You can combine this choice with Power-over-Ethernet to minimize the cabling going all the way up to the gateway.
On the other hand, if you choose WiFi instead of Ethernet, then try to use a dongle with external antenna and move the antenna outside the enclosure to have less noise inside the box.
Setup the hardware:
Before we connect anything and switch on lets get the following configurations done on the raspberry pi and the RAK 831 module:
RASPBERRY PI
1) Get the raspberry pi 3 board and get a 8gb micro sd card ready with the raspbian software. You can even buy a noobs sd card with the software pre loaded. On how to flash the os on the sd-card please follow the instructions here: https://www.raspberrypi.org/learning/hardware-guide/
2) Connect the raspberry pi to 5v 2amps power supply. THIS IS VERY IMPORTANT. The lora module may draw 700 mA peak during active wireless transactions and hence have a good power brick to power the raspberry pi
RAK 831:
1) Before you even power on the board get the antennae that came in your kit and connect it to the antennae screw terminal. THIS IS ESSENTIAL.
Connection details:
Here is a table showing how to connect the rak831 module with the raspberry pi:
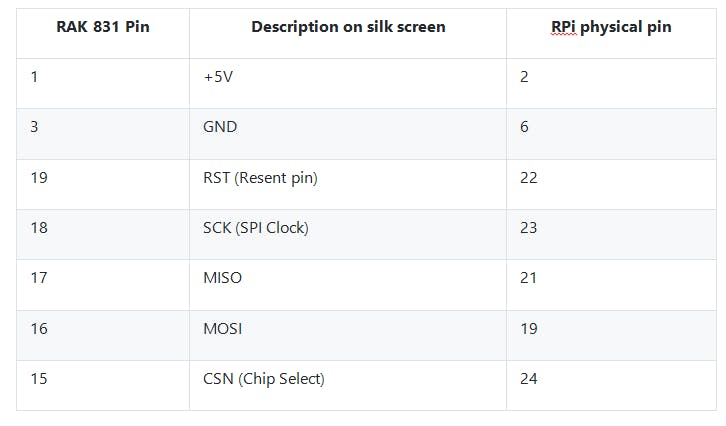
rak 831 silk screen map to the rak 831 pins
For understanding the Raspberry Pi pin layout head over to: https://www.raspberrypi.org/documentation/usage/gpio/ for details
Notes:
- The reset pin can be connected to any of the GPIO on the raspberry pi 3.
- It is essential to be sure that you connect the power supply pins correctly to avoid damage to the RAK 831 board.
Enable SPI:
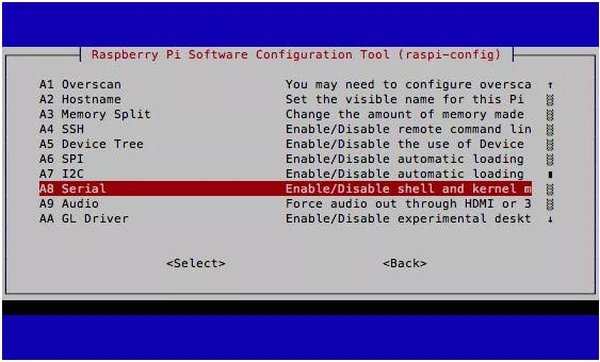
The SPI peripheral is not turned on by default. To enable it, do the following.
- Run sudo raspi-config.
- Use the down arrow to select 9 Advanced Options
- Arrow down to A6 SPI.
- Select yes when it asks you to enable SPI,
- Also select yes when it asks about automatically loading the kernel module.
- Use the right arrow to select the <Finish> button.
- Select yes when it asks to reboot.
The system will reboot. When it comes back up, log in and enter the following command
>ls /dev/*spi*
The Pi should respond with
/dev/spidev0.0 /dev/spidev0.1
These represent SPI devices on chip enable pins 0 and 1, respectively. These pins are hardwired within the Pi. Ordinarily, this means the interface supports at most two peripherals, but there are cases where multiple devices can be daisy-chained, sharing a single chip enable signal.
Supply power to the board:
As with any wireless projects, they tend to require more power than the host board can provide via the supply pins. The two schemes below enumerate how you can power the RAK 831 and raspberry pi 3.
1) Power the 5v rail from the Raspberry Pi
2) Power the 5v rail on the Raspberry Pi and RAK831 separately
Software installation:
On the Raspberry pi lets do the following steps to get the essential software installed:
- Enable SPI:
Use raspi-config utility to enable SPI ([5] Interfacing options -> P4 SPI) and also expand the filesystem ([7] Advanced options -> A1 Expand filesystem):
$ sudo raspi-config
- Make sure git is installed
Sudo apt-get update
Sudo apt-get upgrade
Sudo apt-get install git
- Manage your wifi connection on the raspberry pi
- Configure the wifi credentials (check here for additional details)
$ sudo nano /etc/wpa_supplicant/wpa_supplicant.conf
And add the following block at the end of the file, replacing SSID and password to match your network:
network={
ssid=“The_SSID_of_your_wifi”
psk=“Your_wifi_password”
}
- Clone the installer and start the installation
git clone -b spi https://github.com/ttn-zh/ic880a-gateway.git ~/ic880a-gateway
cd ~/ic880a-gateway
sudo ./install.sh spi
- The installation step will ask you if you want to enable remote configuraton. Type ‘y’ or ‘yes’ and continue with the installation. At the start of the command line install, the script would show you the gateway EUI which is important for the next steps. NOTE IT DOWN !
- If you want to use the remote configuration option, please make sure you have created a JSON file named as your gateway EUI (e.g. B827EBFFFE7B80CD.json) in the Gateway Remote Config repository here: https://github.com/ttn-zh/gateway-remote-config. Fork the repo, add your <EUI>.json file with the proper configuration and then commit the forked repo. Once done, send a pull request to the master repo and the file should show up in the repo the next day. A sample json is shown below:
{
“gateway_conf”: {
“gateway_ID”: “the id as you noted down in the install.sh console output”,
“servers”: [
{
“server_address”: “the router to which you want to connect to”,
“serv_port_up”: 1700,
“serv_port_down”: 1700,
“serv_enabled”: true
}
],
“ref_latitude”: the lat of the rak 831 gateway,
“ref_longitude”: the long of the rak 831 gateway,
“ref_altitude”: 40,
“contact_email”: “contact email of the gateway owner”,
“description”: “a short desciption”
}
}
Note:
For a list of valid routers check the link here:https://www.thethingsnetwork.org/wiki/Backend/Connect/Gateway
- By default, the installer changes the hostname of your Raspeberry Pi to ttn-gateway (to prevent collisions with other Raspberry Pis in your network). You can override this in non-remote configuration mode.
- HURRAY your gateway should now work. Make sure you restart the gateway the next day for your json file to be downloaded properly to the RPi3.
- Note that the global_config.json in needs to be adjusted as per:
https://github.com/TheThingsNetwork/gateway-conf/blob/master/US-global_conf.json
for those looking to use the mp_pkt_fwd instead of the old poly packet forwarder heard over here and install the same with the instruction provided:
https://github.com/kersing/packet_forwarder/tree/master/mp_pkt_fwd. Again you can see the global_conf..json file in the root of the project just make sure you edit the file (imp sections described below) and copy the same to the bin folder after compilation.
Some configurable entities in the global_conf.json:
The global_conf.json file can be found in ./bin/global_conf.json from the base of your project directory after the install script has run. Here is a list of some entities that you might want to edit in the global_conf.json file for your particular gateway configuration:
1) “radio_0” or “radio_1” configuration , especially the Frequency parameter and the min and max frequency sweep paramaters.
2) “gateway_conf” section., Especially the gateway ID or the EUI of your gateway.
3) server up and down port in the same gateway_conf object along with your TTN server address of the address of your own application server if it is available.
Resetting the board:
When ever we start the raspberry pi, it is a good practice to reset the attached RAK831 lora module. There are two ways to do it:
- Via Shell script:
A small shell script can be written to reset the RAK831 before the LoRa driver can access the hardware. The content of the shell script can look like the following example (which assumes that the GPIO 17 (pin 11) of the Raspberry Pi is connected to the reset pin of the RAK831):
#!/bin/bash
echo “17” > /sys/class/gpio/export
echo “out” > /sys/class/gpio/gpio17/direction
echo “1” > /sys/class/gpio/gpio17/value
sleep 5
echo “0” > /sys/class/gpio/gpio17/value
sleep 1
echo “0” > /sys/class/gpio/gpio17/value
These lines can be stored in a file called “rak831_reset.sh”. The user must call this script once after every boot up in order to get the concentrator IC in a clean state.
- Via Wiring pi:
If the host system is a Raspberry Pi the user can write a small C-Tool to reset set the RAK831. In order to access the GPIO pins of the Raspberry Pi there is a library called “wiringPi” that takes care of the low level details. The library can be downloaded from http://wiringpi.com. Please refer to this site to get installation and usage instructions. The content of the RAK831_reset.c file can look like the following:
#
int main() {
wiringPiSetup();
pinMode(GPIO_RESET_PIN, OUTPUT);
digitalWrite(GPIO_RESET_PIN, HIGH);
sleep(5);
digitalWrite(GPIO_RESET_PIN, LOW);
return;
}
The user must call this tool once after every boot up in order to get the concentrator IC in a clean state.
gcc -Wall -o blink blink.c -lwiringPi
sudo ./blink
Register the gateway to the TTN network:
To get your nodes to send data to the cloud TheThingsNetwork provides a cloud service to parse and store the data sent by lora nodes via a lora
Read More Detail :Getting started with the RAK 831 Lora Gateway and RPi3


