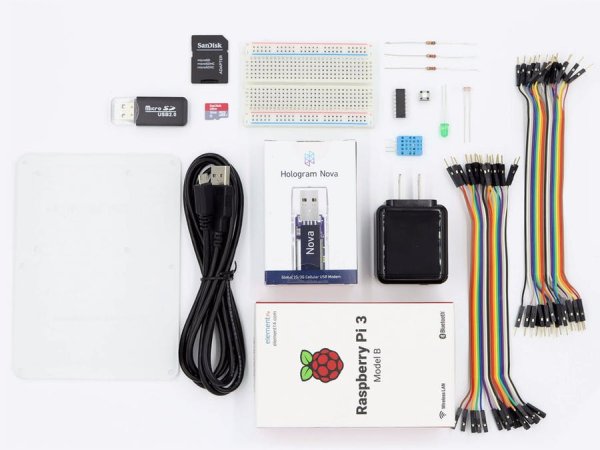
New to Nova? New to Raspberry Pi? New to Python? This tutorial goes along with our kit, walking you through each step.
Story
This tutorial is part of a kit Hologram offers: https://hologram.io/store/nova-starter-kit-for-raspberry-pi-3
Setup a Raspberry Pi – Headless
Note: You can skip to the next section if you already have Raspbian installed on an SD card and can SSH into it or have access to its terminal.
Setting up a headless Raspberry Pi means we're going to setup a computer without hooking up a monitor, keyboard or mouse to the device. We're going to do everything remotely from our main computer.
1. Download and burn the Raspbian OS to SD
Getting started notes:
- Raspbian is a flavor of Debian, made specifically for the Raspberry's ARM architecture
- Both Lite or Full versions will work (Lite does not include a desktop UI, not needed for this tut)
- We will not use NOOBS since it adds unwanted extra steps
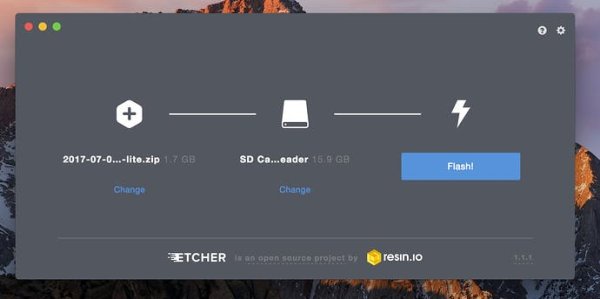
- We're using a cross platform tool called Etcher to transfer the downloaded Raspbian image to an SD card.
Download Raspbian: https://www.raspberrypi.org/downloads/raspbian/
Download/install Etcher: https://etcher.io/
Burning Raspbian to SD Card:
- Insert the SD card into your computer
- Open Etcher app
- Select the downloaded Raspbian zip file as the OS
- Select the inserted SD card as the targeted drive
- Click “Flash!”
- Etcher should look something like this…
2. Configure Raspbian
After Etcher is complete we'll want to access the SD card while still mounted to your computer. If the SD card was ejected after Etcher completed then unplug/replug the SD card and make sure it is mounted.
Open a local terminal app. I like using Hyper Terminal.
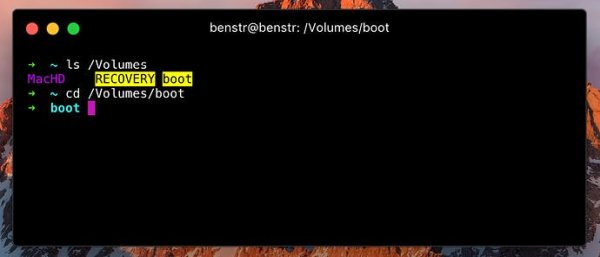
Change directories to the boot drive, on a Mac it would be:
cd /Volumes/boot
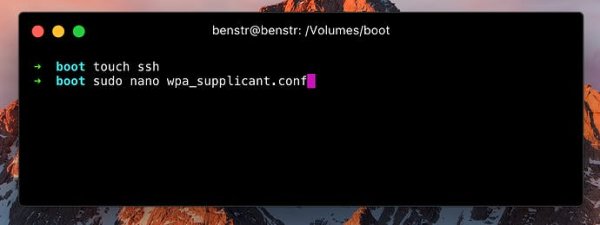
Enable SSH by creating an empty file.
touch ssh
Create and edit wpa_supplicant.conf to pre-configure WiFi. Configuring this will allow the Pi to automatically join a network at boot if available. The Pi only has a 2.4Ghz antenna and not compatible with 5Ghz routers. Run the following to configure WiFi:
sudo nano wpa_supplicant.conf
Note 1: Adding sudo to the beginning of a command will give you root (super user) rights. This topic gets a little hairy, if you follow these instruction verbatim you'll be ok.
Note 2: What is nano? Nano is a lightweight text editor that works inside the terminal. Calling nano followed by a file will open that file for editing.
With nano open to a blank file, paste the following snippet in – modifying it with your own network credentials.
country=US
ctrl_interface=DIR=/var/run/wpa_supplicant GROUP=netdev
update_config=1
network={
      ssid="**your-wifi**"
      psk="**your-password**"
      key_mgmt=WPA-PSK
}
For insecure networks:
country=US
ctrl_interface=DIR=/var/run/wpa_supplicant GROUP=netdev
update_config=1
network={
    ssid="**your-wifi**"
    key_mgmt=NONE
}
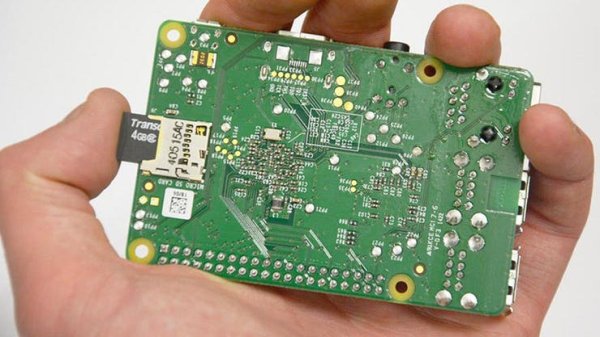
Press CRTL+X to exit, Y to save, ENTER to confirm and exit the Nano editor. Eject the SD card from your computer and insert it into the Raspberry Pi.
3. Connect to the Pi over WiFi SSH
Apply power to the Raspberry Pi through its micro USB power port and wait one minute for the device to startup and connect. You do not need to plug in the Nova yet. Please ensure you use the supplied power adaptor, it's important your Pi gets the recommended 5V 2.4A.
On your main computer (not the Pi) open a terminal, you may even still have the terminal open from the last few steps. We're going to use SSH (Secure Shell) to access the Pi's terminal remotely from your main computer. Think of it like remote desktop, but instead of a desktop it's a terminal.
In the terminal run:
ssh pi@raspberrypi.local
Password is raspberry.
Troubleshooting:
- What if the device is not found? The Pi probably is not on the network. Put the SD card back into your main computer and redo the last step, ensuring the wifi credentials are correct and you're connecting to a 2.4Ghz network.
- What if there are multiple Raspberry Pi's on my network sharing the same hostname? You'll need to access the Pi by local IP address instead of the hostname.local. Identify the device's IP by logging into your router's admin backend or using an app like Bonjour Browser. Find the IP address access the device through SSH > ssh [email protected]
Further Pi configuration.
Now you should remotely be inside your Pi's terminal. We're going to finish up configuring the Pi. From the SSH command line run:
sudo raspi-config
A screen like this should appear:
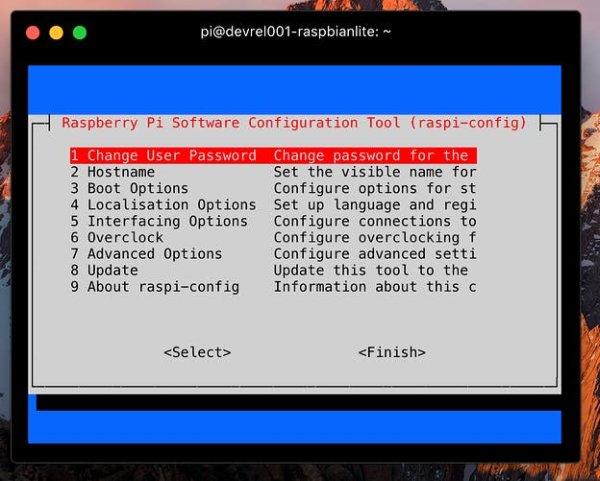
Lets run through all the things we need you to do here.
- Expand SD Storage: 7 Advanced Options → A1 Expand Filesystem
- Enable I2C to read analog sensors: 5 Interfacing Options → SPI
- Change Password: 1 Change User Password → enter new password (remember this!)
- Change Hostname: 2 Hostname → enter new hostname (remember this!)
- Select Finish and approve the Pi reboot
After the Pi reboots we'll SSH back into the device. Make sure to use the new hostname and put .local after the hostname. Example: ssh [email protected]
4. Install Dependencies
I know this is a bit long but I swear we are almost done! From inside an SSH session run the following commands.
Update your Pi's code libraries:
sudo apt-get update
Install some of my favorite required libraries:
sudo apt-get install git git-core build-essential python-dev python-openssl python-smbus python3-pip python-pip screen
Install Hologram's Python SDK for interacting with the Nova:
curl -L hologram.io/python-install | bash
Verify Hologram's CLI (Command Line Interface) was installed. It should return a version greater than 0.6.0.
hologram version
Congrats! You completed setting up your Raspberry Pi and you never hooked up a monitor! You're now a pro!
Lesson 1 – Blink an LED
We'll be interacting with General Purpose Input/Output Pins (GPIO for short). For a quick refresher on the major nuances of Pi GPIO pins, check out this StackOverflow. For this project we'll be using BCM numbering.
Posting the pinout here for quick reference:

For those not familiar with breadboards, check out this video by ScienceBuddiesTv explaining how electricity runs through a breadboard.
For lesson 1 we'll set one of our Pi pins as an output, controlling electricity to light an LED on demand.
Wiring Diagram
Below is how you should connect everything. Use a 220ohm resistor. The color of the wires to not matter but generally RED represents power and BLACK represents ground.
Note: ALWAYS make sure to remove power to the Pi before wiring.
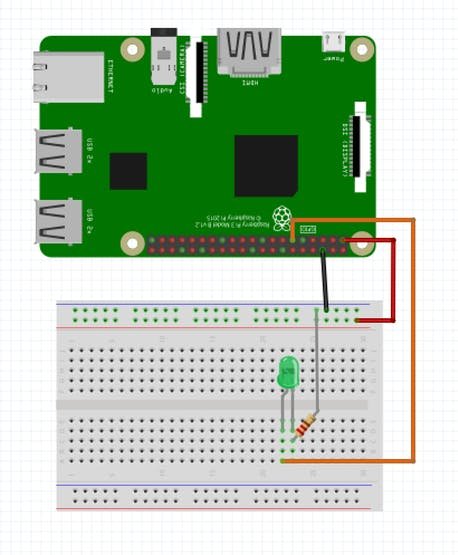
Reconnect power, wait a minute, and re-establish an SSH connection.
Run the Code ??
I've already created the code needed to blink the light and stored it on GitHub for anyone to access. We're going to clone (fancy word for copying) code from my GitHub repo to your Pi by running the following command.
git clone https://github.com/benstr/nova-starter-kit.git
Now you should have a new folder on our Pi filled with goodies!
ls nova-starter-kit/
Run the code by issuing the following command.
sudo python nova-starter-kit/01_blink/main.py
The terminal will ask you how many times you'd like to blink the LED. Enter a number and watch the light turn on and off. YAY we are controlling electric!
There are two files controlling the LED. Look at the code for each file by sending each one of these commands.
cat nova-starter-kit/01_blink/main.py
Main.py references another file for its LED commands, myLED.py . Let's look at this file too.
cat nova-starter-kit/01_blink/myLED.py
Be Ambitious!
I've added some additional functions in myLED.py which you can access in main.py. Go ahead, edit main.py and call some more functions from myLED.py. Run your modified code and see what happens:
sudo nano pi-starter-kit/01_blink/main.py
Lesson 2 – Read a Digital Sensor
In this lesson we'll add a digital sensor and read it's value. The DHT11 senses humidity and temperature, sending the results through a digital signal. The Pi's pins can read digital sensors out of the box.
In this lessons code folder we add a new file called myDHT.py . In this file we set a pin as an input and create some functions for common uses. Adafruit's DHT python library is the real star, making it super simple to read the DHT sensor.
You can read more about DHT sensors from Adafruit: https://learn.adafruit.com/dht
Wiring Diagram
Below is how you should connect everything. Use a 10k resistor.
Note: Remember to remove power down the Pi before wiring.
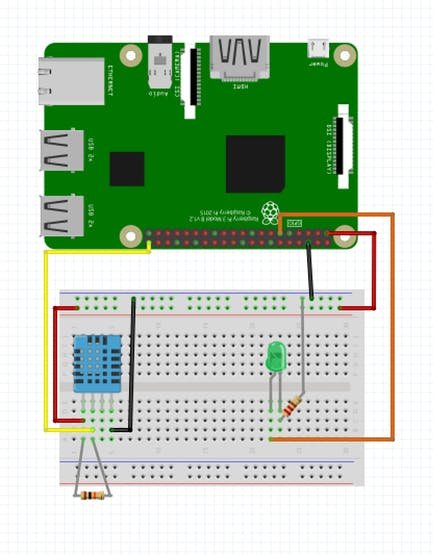
Reconnect power, wait a minute, and re-establish an SSH connection.
Run the Code ??
The coded needed for this lesson is already on your Pi, found in the folder you cloned from GitHub in the previous step.
ls nova-starter-kit/02_digital_sensor/
Before we can run the code I've created you'll need to install Adafruit's DHT library. Clone the new library.
git clone https://github.com/adafruit/Adafruit_Python_DHT.git
Run the install script Adafruit provides.
sudo python Adafruit_Python_DHT/setup.py install
Test the library by running the following command. This will also verify you wired the sensor correctly.
Note: Notice we're passing 11 and 21 to the script. 11 represents which sensor we're using (DHT11), 21 represents the pin we've attached the sensor to.
sudo Adafruit_Python_DHT/examples/AdafruitDHT.py 11 21
After verifying the DHT library is installed, we're ready to run my lesson script. Run the code by issuing the following command.
sudo python nova-starter-kit/02_digital_sensor/main.py
The terminal will not ask you any questions, instead the LED will blink 3 times and display the current Temperature and Humidity in the terminal. Check out the changes I made to main.py
cat nova-starter-kit/02_digital_sensor/main.py
main.py imported a new file, myDHT.py . Let's look at this file too. Like myLED in the previous lesson, I added a few extra functions.
cat nova-starter-kit/02_digital_sensor/myDHT.py
Lesson 3 – Read an Analog Sensor
In the last lesson we read from a digital sensor, a sensor sending 1's and 0's. There is another way some sensors communicate called analog. Analog sensors can send any value.
Some boards, like the Arduino UNO, can read from both types of sensors. Unfortunately the Raspberry Pi can only read digital sensors. In order to read analog sensors we'll need an Analog-2-Digital Converter between the analog sensor and the Pi. This chip will convert the analog signal into a digital output and send it to the Pi.
In this lesson we're setting up an MCP-3008, which converts the value we get from a light sensor (called a photoresistor) and sends it to the Pi. We're adding another Adafruit python library, this time for the MCP chip.
One more note on the MCP-3008. It provides 8 ports, meaning it can read up to 8 analog sensors. We're sending data to port 0. In main.py you'll notice we set which port the photoresistor is using as a global variable.
Wiring Diagram
Below is how you should connect everything. It's important the MCP3008 is facing the correct way. Make sure the notched end is on the left. There are a lot of wires required for the MCP3008 so take your time and double check everything.
Note: Remember to remove power down the Pi before wiring.
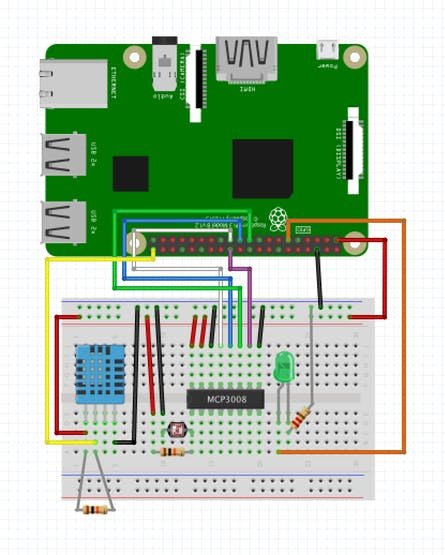
Reconnect power, wait a minute, and re-establish an SSH connection.
Run the Code ??
The coded needed for this lesson is already on your Pi, found in the folder you cloned from GitHub.
ls nova-starter-kit/03_analog_sensor/
Before we can run the code I've created you'll need to install Adafruit's MCP library. Clone the new library.
git clone https://github.com/adafruit/Adafruit_Python_MCP3008.git
Run the install script Adafruit provides.
sudo python Adafruit_Python_MCP3008/setup.py install
After the MCP install is complete it's time to run the lesson script. Run the code by issuing the following command.
sudo python nova-starter-kit/03_analog_sensor/main.py
The terminal will not ask you any questions, instead the LED will blink 4 times and display the current Temperature, Humidity, and now Luminosity in the terminal.
Check out the changes I made to main.py
cat nova-starter-kit/03_analog_sensor/main.py
main.py imported a new file, myMCP.py . Let's look at this file too. Like myDHT in the previous lesson, I added a few extra functions.
cat nova-starter-kit/03_analog_sensor/myMCP.py
Lesson 4 – Trigger with a Button
Ok, we have a fully functioning set of sensors! But, triggering the script through a terminal in a SSH session is not ideal. In this lesson we setup a button to trigger a reading and set the script to continuously loop after the pi boots.
Wiring Diagram
Wiring this button should be a cinch for you now:
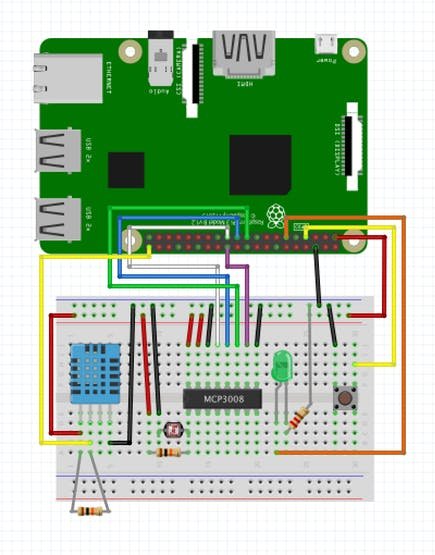
Reconnect power, wait a minute, and re-establish an SSH connection.
Run the Code ??
The coded needed for this lesson is already on your Pi, found in the folder you cloned from GitHub.
ls nova-starter-kit/04_button/
Run the code by issuing the following command.
sudo python nova-starter-kit/04_button/main.py
The terminal will not do anything while it waits for you to press the button. You'll get a reading every time you press the button.
What is happening is called an infinite loop. The script will not stop until you manually stop it. What is the script doing? Listening for a button press. Exit the loop by pressing CTRL + C. Check out the changes I made to main.py
cat nova-starter-kit/04_button/main.py
Run the Code … at Startup! ? ??
We have a button and sensors, yay! but we still need the terminal to start the Python script. Let's set the Pi to automatically run this script at startup.
To do this we'll need to edit a system file using the NANO terminal editor again.
sudo nano /etc/rc.local
This will open a file with important contents already in it. Uses arrows to scroll to the bottom of the document. Move the cursor before the exit0 and add the following line:
sudo python /home/pi/nova-starter-kit/04_button/main.py &
Press CRTL+X to exit, Y to save, ENTER to confirm and exit the Nano editor. Back in the normal terminal we'll reboot the Pi.
sudo reboot
After a few minutes press the button and if the light flashes 4 times then it worked! Now every time you power the Pi this script will be running in the background.
Our script is running at startup, great! But we still need to SSH into the terminal to see the data. Instead let's send the data through WiFi to Hologram's Data Engine.
If you haven't activated your Hologram SIM, please do so now: https://dashboard.hologram.io/activate.
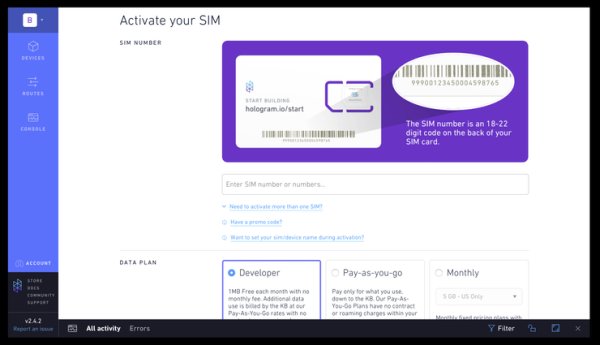
After activation, on the Hologram Device Dashboard, click on the device which represents your Nova to go to its detail page.
From the detail page side-navigation go to the Configuration sub-page. Click Show Router Credentials, generate a new 8 digit code and save it somewhere for the next step.
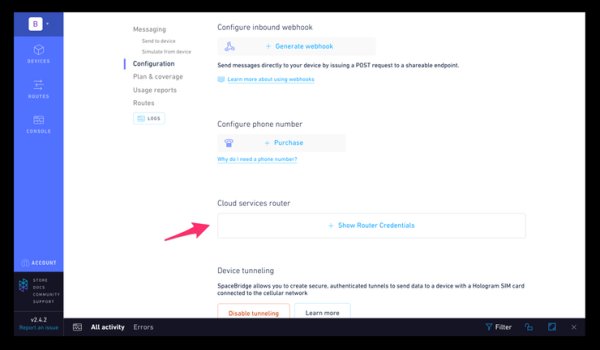
Connect to your Pi through SSH and open the credentials.json file in the NANO editor.
sudo nano nova-starter-kit/credentials.json
Replace … with the 8 character key you got from the Hologram dashboard.
Press CRTL+X to exit, Y to save, ENTER to confirm and exit the Nano editor. Now edit the startup rules to use the main.py file in lesson 5.
sudo nano /etc/rc.local
Change the second to last line from:
sudo python /home/pi/nova-starter-kit/04_button/main.py &
to
sudo python /home/pi/nova-starter-kit/05_cloud/main.py &
Remember this needs to go before exit0 . Press CRTL+X to exit, Y to save, ENTER to confirm and exit the Nano editor. Back in the normal terminal we'll reboot the Pi.
sudo reboot
After a few minutes press the button and if the light flashes 4 times then it worked!
Now for the real magic, go to https://dashboard.hologram.io/?drawer=full and if we did it all right you'll see the sensor results in the cloud!
Check out the changes I made to main.py for this lesson.
cat nova-starter-kit/05_cloud/main.py
Lesson 6 – Send Data through Cellular
Imagine you want to stick this environment sensor array somewhere with no WiFi, like a storage shed or vacation home.
In this lesson we'll add cellular to the script. Steps in this lesson is very similar to the previous.
First, follow the Nova's assembly instructions included with the packaging. Make sure the SIM is inserted correctly and plug the Nova into the Pi. Wait for a solid LED to show on the Nova, followed by a second LED blinking. This means you have an available cell network to connect to.
Connect to your Pi through SSH and edit the startup rules to use the main.pyfile in lesson 6.
sudo nano /etc/rc.local
Change the second to last line from:
sudo python /home/pi/nova-starter-kit/05_cloud/main.py &
to
sudo python /home/pi/nova-starter-kit/06_cellular/main.py &
Remember this needs to go before exit0 .
Press CRTL+X to exit, Y to save, ENTER to confirm and exit the Nano editor.
Back in the normal terminal we'll reboot the Pi.
sudo reboot
After a few minutes press the button and if the light flashes 4 times then it worked!
Now for the real magic, go to https://dashboard.hologram.io/?drawer=full and if we did it all right you'll see the sensor results in the cloud!
Check out the changes I made to main.py for this lesson.
cat nova-starter-kit/06_cellular/main.py
Congrats! You did it!!
Now you can plug your creation in anywhere around the world and gather data about the local environment.
You're now a weather robot maker… say good-bye to the weather man.
Source: Hologram Nova Starter Kit


