
Story
As part of my entry for the Leap Motion #3D Jam, I was excited to build this wireless gesture controlled Search/Rescue Robot based on the Raspberry Pi. This project demonstrates and provides a minimalistic example of how wireless 3D hand gestures can be used to control and interact with physical stuff. 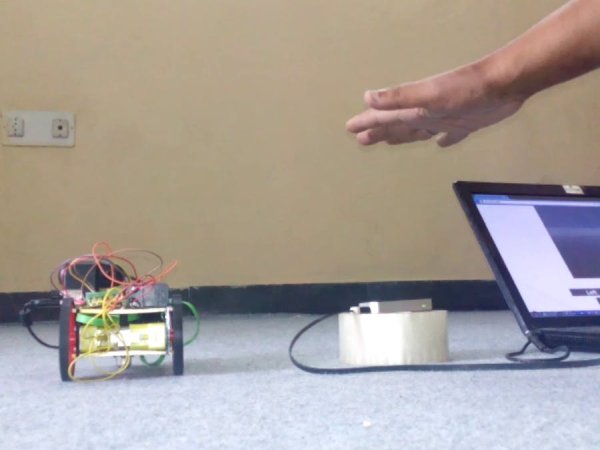
Since this project uses the popular WebIOPi IoT framework on the Raspberry Pi, it can be very easily expanded to control and interface typically any Sensor/Hardware/Electronics that can be interfaced with the Raspberry Pi.
Some possible scenarios I envision fellow Makers may use this project as their base framework to build on:
1. Remote Gesture Operated Bomb Disposal Robot (using maybe an OWI Arm etc)
2. Remote Surgical Operation by a Doctor
3. Gesture controlled interactive Art Exhibits or Educational Content
4. Infinite other possibilities/integrations (I'm limited by my imagination 🙂 )
Project Functionality Overview and Demo
Overview
This project allows a user to interactively control a Robot using 3D hand gestures through a Leap Motion connected to a PC.
The Raspberry Pi on-board the Robot also has a USB Webcam that streams live video back to the user which can be seen on a Web Browser. The LeapMotion JavaScript library embedded into this Webpage processes hand gestures and sends control signals back to the Robot, which then moves accordingly.
The Raspberry Pi on the Robot is configured as a Hotspot (AP mode) with the help of the USB WiFi dongle connected to it. This allows our PCs/Devices to directly connect to the Raspberry Pi and control via a webpage. The Raspberry Pi can also be configured to operate in client mode, wherein it wirelessly connects to the WiFi Router's AP to which the PC/Devices are already connected.
This project is based on WebIOPi (http://webiopi.trouch.com/) which is a popular IoT framework for Raspberry Pi. By using the bundled Weaved IoT Kit (or through port forwarding on Router), this Robot can be remotely controlled and/or receive data from any part of the world.
The following components were used for building the project:
- Raspberry Pi B (100% forward compatible with Raspberry Pi B+)
- Logitech USB Webcam (paltry 1.3 Megapixel)
- L293D Motor Driver IC and Breakout Shield
- USB WiFi Dongle for Raspberry Pi
- USB Power Bank for Raspberry Pi
- External 4V/1.5A Battery for driving the Robot Motors
Project Build
Installing WebIOPi, Writing Custom Code and configuring Webcam:
WebIoPi installation instructions, framework basics and many examples are available at the project page here: http://webiopi.trouch.com/
In order to get the LeapMotion functions embedded on the web page trigger GPIO actions on the the Raspberry Pi, we've used Macros, details of which are found here: http://webiopi.trouch.com/Tutorial_Macros.html
I've also written some getting started notes about the above process that can be downloaded from the project repository found towards the end.
Installing and Configuring Webcam
We're using MJPG-Streamer in order to stream the video feed from the Raspberry Pi back to the Browser through the USB Webcam connected on the Pi. Please follow the setup and build instructions indicated here http://blog.miguelgrinberg.com/post/how-to-build-and-run-mjpg-streamer-on-the-raspberry-pi to get MJPG-Streamer working on the Raspberry Pi.
Configuring the Raspberry Pi as an AP/Hotspot
In order to setup the Raspberry Pi as a Hostpot, please follow the instructions provided here: http://elinux.org/RPI-Wireless-Hotspot. I configured the static IP of the Raspberry Pi as 192.168.42.1 which is what we'd type into the browser once the Pi boots up into AP mode.
WebIOPi, MJPG-Streamer and WiFi hotspot service have been configured to auto run at boot and this allows us to directly open up a Web browser and connect to the Robot after it boots up. The rc.local file available in the repo is used to run the Webcam on boot.
Build/Wiring Instructions
4 GPIOs of the Raspberry Pi namely GPIO 9, 11, 23 & 24 are connected to L293D Motor Driver IC which drives the motors accordingly after receiving macro requests from the Webpage served by the Webiopi framework. The USB WiFi dongle and the USB Logitech Webcam are connected to the 2 USB ports available on the Raspberry Pi. A 5V 4000 Mah Power bank supplies the main power to the Pi. A 4V 1.5A Lead Acid battery is used to drive the Motors.
Note: Since the maximum output current of the power bank I used was a measely 1000 Mah, I had to use the external Lead Acid battery to drive the motors. If you've a power bank that gives >= 2000Mah, you can directly drive the motors from the 5V rail on the Pi (I'd not recommend this for power hungry motors though)
The 3 key subsections of the project LeapMotion Javascript API, WebIOPi and MJPG-Streamer and their basic working/setup are briefly outlined below.
WebIOPi Framework:
The frontend that is shown on the Browser is writted in HTML (Filename: index.html) & Javascript while the backend that drives the GPIOs is written in Python (Filename: script.py). Detailed notes on creating a custom WebApp based on the WebIOPi framework is attached as notes in the Bitbucket repo.
Custom macros defined in the Python script can be triggered from the HTML file.
Eg: webiopi().callMacro("go_forward");
This is a custom call to a macro go_forward defined in the Python script that handles the process of drving both the Motors in the forward direction.
The Robot folder contains these sub-folders:
- html: containing index.html
- python: containing script.py
- mjpg-streamer-r63: containing the build files and executable to run the Webcam
MJPG-Streamer: The Live Video stream from the USB Webcam runs on port 8080 of the Pi by default. In order to manually view the stream, navigate to RASPBERRYPI_IP:8080 on the browser after turning on the Webcam.
The following code found in index.html is used to embed the video stream in the
<img src="https://192.168.42.1:8080/?action=stream"><br/>
LeapMotion Code:
Code snippets from the examples provided in the LeapMotion SDK were embedded into the index.html file. The LeapMotion's leap.js file has to be added into the html folder in the project directory on the Raspberry Pi.
The palmPosition parameter sent by the LeapMotion is used to determine which macro to trigger on the Raspberry Pi.
The Leap Motion planes are shown below: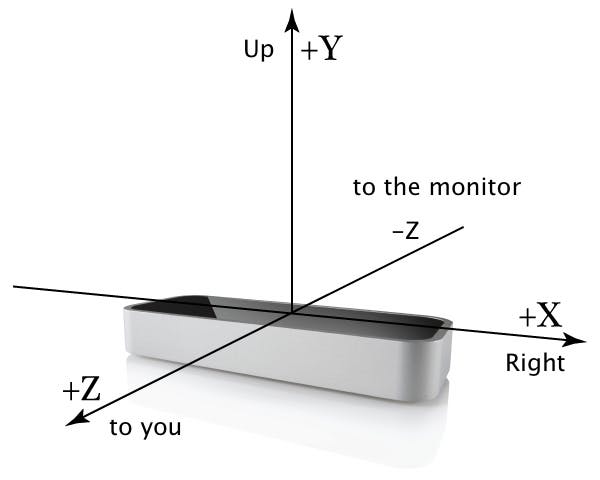
The following code snippet will trigger the Robot to move forward as I thrust my hand in the -ve Z axis.
if(frame.fingers.length > 4 && frame.hands[0].palmPosition[2] <= 0)
{
webiopi().callMacro("go_forward");
}
The frame.hands[0].palmPosition[2] denotes the Z plane while frame.hands[0].palmPosition[0] denotes the X plane. Since I'd be using only one hand to control, I've hardcoded the hands[0] object which links to one hand.
For more detail: Leap Motion Controlled Remote Search and Disposal Robot