With immense variety of web servers in the market, choosing the right one for the right reason is very difficult. In that case comparison between various servers will result to an utter confusion. The reason behind this confusion is, whenever you search for the server with greater performance, immediately your cost of installation increases. And to decrease the installation cost you have to choose a server which is less efficient. So, it is completely your decision to choose the right one. First of all you must know your requirements. For the purpose of testing environment or to simply store files, a cheaper web server is enough for the system. And for higher efficiency and greater work pressure your system would require a costlier web server which delivers immense performance.
In case of Raspberry Pi, it will serve your purpose as a cheap server. We know that a Raspberry platform delivers moderate work efficiency but maintains high cost efficiency. Similarly, if Raspberry Pi platform is converted to a Web Server, it will deliver the basic functions with low installation cost. So refer the article to make a low cost Raspberry Pi web server.

This is simply a manual to the processes involved in converting a Raspberry Pi into a web server.
How to make a Raspberry Pi Web Server
Components required:
- Raspberry Pi (Latest model)
- Raspbian running SD card
- MicroUSB power cable
- USB WiFi Adapter
- USB keyboard and mouse
Let us get into the steps involved for conversion:
To start the Raspberry Pi Operating System
In order to set up the Pi Operating system you need to follow the below steps:
Step1: Download Pi operating system preferably the Raspbian, which you can get from any source via internet.
Step2: Obtain a tool called Win32 Disc imager from any available link. This tool will help extract the image to the Raspbian running SD card. This is done through some simple steps.
- Inform the drive letter about the inserted SD card.
- Choose the location of the Raspberry Pi icon
- After choosing, select burn.
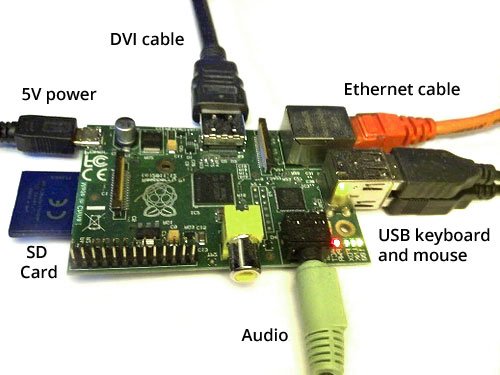
Step3: After burning the SD card, place it inside the Pi at its appropriate position. Along with the SD card start plugging the other cables. But one should remember that mini USB must be plugged last.
Step4: By now the Raspbian operating system gets loaded in the system. Immediately after completion of loading procedure you need to log in by using the default username “pi” and default password “raspberry”.
Step5: Change the default password. Enter the new password again and confirm it. While typing the new password the cursor on the screen will not move.
Optimization of the softwares
Step1: As you are using the fresh version of Raspbian OS, so some amount of optimization of the software has to be done. In this step you need to update the sources, the clock and also upgrade any pre-installed software packages. For this, type the required update on the command line and press enter after every line.
Step2: Set the date and time in a similar way by just typing the required data on the command line and then press enter.
Update your system
Step1: In order to update your Pi, you need to install the Hexxeh’s RPI update tool. Installation of this tool is carried out in the following commanding process:
For more detail: How to make a Raspberry Pi Web Server

