
An interface conveys information and allows the user to control things. Most home automation platforms rely on a “virtual interface ”. You pull out a smart phone and open the app to see what’s going on with your house and turn lights on and off. That works OK when you’re away. But looking at a virtual representation and parsing the information on the display takes work. It requires focus, and doesn't feel intuitive. I wanted to make a “physical interface” – a small model house that physically mimics the things I want to know about with my real house. So when the garage door is opened, I want the garage door on the model to also open. This model house could sit on my coffee table, and I can glance at it to see if the garage door has been left opened before going to bed. Or I can have this on my desk at work, connected to my home via VPN. When I’m at work, I can glance at it to see if the front door has been left opened. This physical interface can be as creative or as utilitarian as I make it.
o, in the following steps, I will
- Build a model house to display things like door position, energy usage, and whether a light has been left on.
- Build an energy monitor using the Open Energy Monitor Arduino library, and feed energy use information to the model house and to OpenHAB
- Provide a couple ways of sending door/window position to the model house. Show how the Wink Hub and the Wink “Tripper” contact sensor data can be utilized in a DIY home automation system.
- Use Wink and Arduino to perform outputs, like open/close the actual garage door or turn lights on and off.
The model house has some servos and LED's wired to an Arduino controller. This controller subscribes to MQTT messages that indicate door positions and energy usage, and actuates the servos accordingly. Same idea with the LED that indicates whether a light is on or off. There's a few options for getting this sensor information to the MQTT broker, so I'll detail that in later steps. In the middle of it all is a Raspberry Pi running a MQTT broker (Mosquitto) and OpenHAB. Although OpenHAB is not needed to run the model house, it is needed to provide the interface for the smart phone app, and allow remote monitoring and actuation. Just because I want to have a physical interface doesn't mean I'm ready to throw out the virtual one.
The model house also has two buttons. One of the buttons toggles a zigbee lightbulb on/off. The other button opens and closes the garage door (on the REAL house).
Part 1: House Construction
1) Construct model house
2) Control options, wiring, & code
Part 2: Inputs (Sensors)
3) Sensor: Energy monitor
4) Sensor: DIY sensor node option
5) Sensor: Wink Hub & Tripper contact sensor
Part 3: Outputs
6) Lights
7) Garage door opener
Step 1: Model House Construction
I don’t intend this step to be prescriptive. I’m pretty amature when it comes to arts and crafts, so I’ll just show how I built my model house. You’ll want to build it to resemble your own dwelling and reflect the things you care about. Lots of room for creativity here. Some of the components in this picture (like the current transformer) will be used in later steps.
Components:
- (1) Box. It’s up to you how big and what proportions.
- (3) Tower Pro SG90 servo http://www.dx.com/p/towerpro-sg90-9g-mini-servo-w…
- (2) small hinges http://www.homedepot.com/p/Stanley-National-Hardw…
- (some) Adhesive material. I used double stick adhesives from 3M hooks.
- Arduino Yun or Arduino Uno w/ Ethernet shield.
- Buttonshttp://www.radioshack.com/mini-spst-1-5-amp-moment…
- Stuff laying around the house
Roof
I cut out one of the side flaps of the box and attached it to the other (still attached) side flap to form a roof. I used a small box to provide a structure for the right angle, and later supported it better with a Lego piece. You can probably just use whatever you have around the house to make this right angle.
Doors / Windows
Cut the holes for doors that you want to show. Attach a hinge or two on the door with double stick tape and attach to the house. I know, nothing fancy, so feel free to improvise with what you got around the house. I used 3M double sided foam adhesives, the kind that comes with hooks. I also used these foam adhesive strips to mount the servo motors. For the garage door, the servo motor arm moves the garage door open, and gravity closes the garage door. For the front door, I needed to attach a string on the hinged door so the servo arm can open the door. The yellow Lego piece you see is there to offset the servo from the hinge.
Energy Meter
Nothing fancy. Just cut out an arrow-looking thing and attach it to the servo arm. Cut out a vaguely shrub looking shape and mark it up with a kilowatt scale, and friction fit the servo motor onto the box with the shrub in between.
I also have two buttons to control lights and the garage door. These are momentary buttons. The buttons are threaded with a nut on the outside to hold it against the cardboard box wall. On the other side are the metal contacts for wires to be soldered on to.
 Wiring
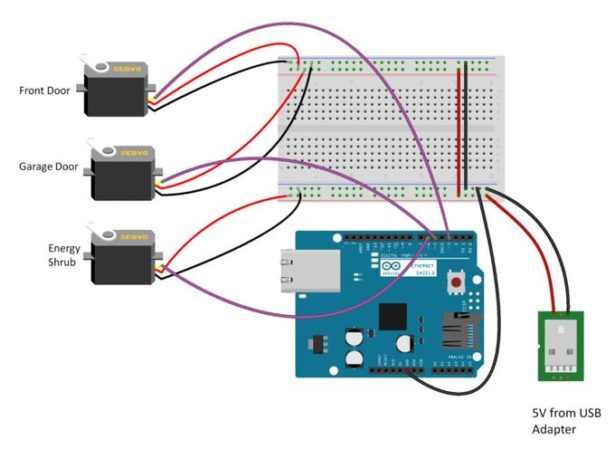
Here's the wiring diagram. I made a pretty big mess of the wiring inside the box. If you'd rather just know which wires are on what pins:
- status pin LED: 7
- lighting indicator LED: 4
- Servo 1 (front door): 3
- Servo 2 (garage door): 5
- Servo 3 (shrub of energy use): 6
- Button 1 (Lights on/off): 8
- Button 2 (Garage door open/close): 9
For more detail: Physical Home Automation Interface