Instructions for employing a Raspberry PI as a water alarm system
Version 1.0, published in Jan 2015
The Raspberry Pi reads the status of one or two water sensor device(s) on one or two of its GPIO pins. When water is detected the Raspberry Pi emails out an alert to a recipient group and calls a phone number list via VoIP playing a stored wave file with a spoken alert phrase.
If the running system hangs up for some reason, an activated built-in watchdog would automatically start up the system again running the required scripts for the water alarm system. So the system should always be alive!
The phone and email list is kept in a separate simple txt-file. The data will be read in by the main python script on demand. That allows comfortably updating remotely the data on the RasPi via SSH without affecting the running system.
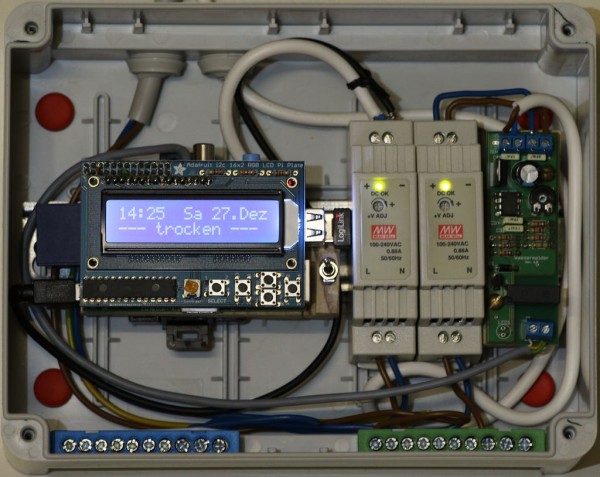
The setup uses the Adafruit RGB Positive 16×2 LCD+Keypad Kit for Raspberry Pi allowing a red or green backlight indicating visually the status of the water sensor(s), see fig. 1. Alternatively, a corresponding monochrome display can be used as well, see figure 2.
The arrangement in figure 1 houses the RasPi with the LCD display in a Perspex enclosure, and the power supplies and the water sensor unit (without the probes) are protected in a waterproof box. That emphasises the beauty and production quality of the RasPi but also allows a good access to the buttons on the LCD display. In contrast is the arrangement in figure 2 with a monochrome display and everything kept tidy in a waterproof enclosure.
On the first day of every third month an email is sent to the first email-recipient reminding that the RasPi is still alive despite the activated built-in hardware watchdog. The email-addresses and phone numbers will be listed allowing comfortably checking whether they are still up to date.
By pushing any of the buttons on the display board a query for shutting down or rebooting the system is prompted. That might be helpful for any kind of maintenance on the hardware.
The video shows the RasPi in operation with many of its features.
 sipcall.c15 KB
 PJSIP_INSTALL.sh404 bytes
 phone_and_email_list.txt546 bytes
 Makefile211 bytes
Step 1: Hardware requirements
The following hardware is required for this project:
- Raspberry Pi (Model B or B+)
- 5V power supply (e.g. for enclosure with system 45 grid)
- SD card of at least 4GB
- Internet connection either via LAN cable or USB WiFi dongle
- Adafruit RGB Positive 16×2 LCD+Keypad Kit for Raspberry Pi or Adafruit monochrome Positive 16×2 LCD+Keypad Kit for Raspberry Pi
- Enclosure which suits the LCD Display, eg. for Model B or Model B+
- 1 or 2 water sensor units, for example from Pollin
- 12V power supply for water sensor unit (e.g. for enclosure with system 45 grid)
- 2 Resistors (1 kΩ and 10 kΩ) per sensor unit, stripboard, wires
- Waterproof enclosure (e.g. for system 45 grid)
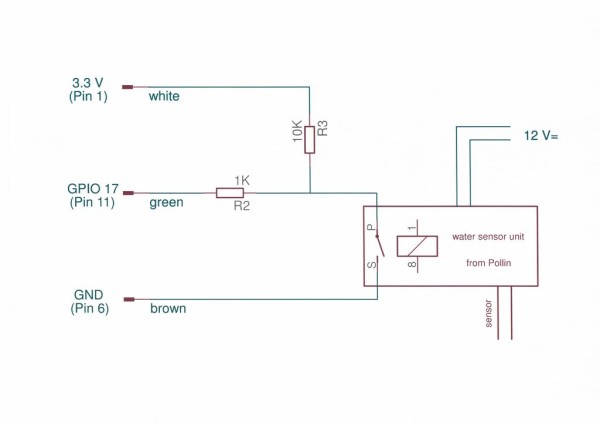
The water sensor has to be connected to the GPIO pins. The setup from fig. 3 allows reading high or low on GRIO 17 (pin 11) according to the status of the water sensor.
When water is detected, the relay closes and pulls GPIO 17 from 3.3 V (high) down to GND. Alternatively, a sensor can be connected to GPIO 18 (pin 12) accordingly. However, the meaning of high and low is here vice versa, i.e. the relay is closed for dry conditions. That gives more flexibility in using any water sensor unit and the corresponding GPIO pin can be selected in the script and hence indirectly the kind of sensor.
If two sensors are used in total (yes, that is also possible) it is more convenient if they are of different kind. If they are of same kind the script has to be adjusted for either GPIO pin 11 or 12 depending of the type of sensor.
Using a stripboard allows you to assemble tightly the few parts of electronics (resistors and wires) as a kind of prototyping circuit board. It fits nicely on the backside of the LCD plate without causing problems placing the LCD plate onto the GPIO pins of the RasRi.
The stripboard is glued to the LCD plate with a hot melt glue gun (fig. 4). Check the correct position first! The wires can be soldered to the top end of the required GPIO pins and passed through holes on the Adafruit PCB (printed circuit board), see fig. 5.
Step 2: Initialising the Raspberry Pi with Raspbian Wheezy
When starting from scratch, download the Raspbian Wheezy operating system from the Raspberry Pi Foundation and transfer it onto the SD-card. Windows users can do that easily with the Win32DiskImager. Insert the SD-card into the Raspberry Pi and start up. You will end up in the configuration menu to do some settings such as choosing the language, local time, keyboard layout, etc. as explained here.
If you are using an USB WiFi dongle set up your WiFi connection. Raspbian Wheezy offers a WiFi configuration utility. The shortcut for this is on the Desktop (WiFi Config). Before we move on we give the user root privileges for the whole session with the command
sudo –i
With the root privileges we don’t have to type sudo any more at the beginning of each command in the terminal window. However, once we reboot the system we have to type sudo –i once again. Next, we do some updates by typing certain commands in the terminal window. However, it is more convenient if you open the ‘Instructions.docx' document and copy and paste the commands from the document into the terminal window. In that case install the office software libreoffice-writer
apt-get install libreoffice-writer
First we update APT, the Advanced Packaging Tool. APT keeps a list of all available packages from the repositories and their dependencies.
apt-get update
The currently installed packages on our system get upgraded to the latest versions by
apt-get upgrade
An update must be performed first so that apt-get knows that new versions of packages are available. Now we remove package files that can no longer be downloaded and are largely useless. That allows a cache not to grow out of control but to be kept minimized.
apt-get autoclean
We remove further packages which were automatically installed by other packages to satisfy dependencies and are no longer needed.
apt-get autoremove
Finally we update the firmware and kernel on the Raspberry Pi. The firmware is a small package of code that helps the software know how to talk to the hardware.
rpi-update
reboot
Step 3: Setting up the GPIO of your Pi
We need to install RPi.GPIO, the python library for Pi that allows easy GPIO (General Purpose Input Output) access. On Raspbian, just run
apt-get install python-dev
apt-get install python-rpi.gpio
Step 4: Setting up your Pi for I2C
The setup uses the Adafruit RGB Positive 16×2 LCD+Keypad Kit for Raspberry Pi which allows a red or green backlight indicating visually the status of the water sensor. Alteratively, the monochrome sister kit can be used, however without the coulor visualisation.
The character LCD display only uses the two I2C pins on the Pi! Therefore the I2C has to be set up on the Pi. Since Raspbian is used as OS, edit /etc/modules with
nano /etc/modules
and add following two lines
i2c-bcm2708
i2c-dev
to the end of the file. Then save and reboot to enable the hardware I2C driver.
reboot
Before you can get started with I2C on the Pi, you'll need to run through a couple of quick steps from the console. Just enter the following commands to add SMBus support (which includes I2C) to Python:
apt-get install python-smbus
apt-get install i2c-tools
i2c-tools isn't strictly required, but it's a useful package since you can use it to scan for any I2C or SMBus devices connected to your board. If you know something is connected, but you don't know it's 7-bit I2C address, this library has a great little tool to help you find it:
i2cdetect -y 0 (if you are using a version 1 Raspberry Pi)
i2cdetect -y 1 (if you are using a version 2 Raspberry Pi)
This will search /dev/i2c-0 or /dev/i2c-1 for all address, and if an Adafruit LCD Plate is connected, it should show up at 0x20 (see fig. 6).
The LCD Pi Plate Python code for Pi is available here on Github. The easiest way to get the code onto your Pi is to hook up an Ethernet cable, and clone it directly using ‘git', which is installed by default on most distros. Simply run the following commands from an appropriate location (ex. “/home/pi”):
apt-get install git
cd /home/pi
git clone https://github.com/adafruit/Adafruit-Raspberry-Pi-Python-Code.git

Adafruit_I2C.py,
Adafruit_MCP230xx.py and
Adafruit_CharLCDPlate.py
from the appropriate folders to a new folder “water_alarm_system”. They will be used by the main program “water_alarm_system.py” and have to be in the same folder.
For more detail: Raspberry Pi water alarm system


