
In industrial automation & other areas most of the time, we want data to be viewed at control room or head office with far distance, Thats why i made Raspberry Pi Wireless Display Receiver ,As RPi made its 1oth Million sale this year on its Birthday Day September 8th and am proud to part of it. Its A Credit-card Sized PC but for debugging & project purposes its cumbersome to carry an additional display just for that. Also, many of us wont have access to a HDMI display too. I have been looking of a way to connect to my Pi via wireless media for ssh and almost as a Wireless Display, without necessarily using the internet (though its would not hurt if u had internet).
List of Required items for Raspberry PI Wireless Display Receiver :
- Raspberry Pi 3 (with Pixel UI Raspbian). Buy Now.
- DSTV Drifta Wifi Dongle or Wifi Accesspoint or Smartphone Wifi Hotspot.
- Windows 10 PC
- Advance IP Scanner. Download
- RealVNC. Download
- Putty for SSH. Download
- (Optional) Components required for setting it up the first time:
- HDMI/HDMI to VGA module (Now Available) for use with a VGA Monitor.
- Keyboard and Mouse.
The reason why I came up with this tutorial was because: one day, i was struggling to work on the raspberry pi while at school, since i cant carry my 32inch Display or have any Portable Screen. (Now Available) Hence, I came up with this tutorial so that others who are also in the same situation as ours would be able to use the display of their laptops as a monitor to the Raspberry Pi.
HOW DOES Raspberry PI Wireless Display Receiver WORK?
The main aim is to interact with the desktop GUI (Graphical User Interface) of the raspberry pi on your Laptop Display, We will begin by connecting the raspberry pi to the PC through Wifi (For Wireless Display) or ethernet , the point is to have both devices in the same network. There are many softwares available that could establish connection between the raspberry pi and your laptop. We will be using the RealVNC server software to connect the pi to your laptop.
Installing the VNC server on your pi allows you to see the raspberry pi’s desktop remotely, using the mouse and keyboard as if you were sitting right in front of your pi. It also means that you can put your pi anywhere else in your home, but still control it. Also, internet can be shared from laptop’s WiFi over Ethernet or through shared Wifi AccessPoint . This also lets you access internet on the pi and connect raspberry pi to laptop display. Internet is need to install the programs on your Pi.
STEP 1 : SETTING UP YOUR RASPBERRY PI
Before moving to connect raspberry pi to laptop display, you need an SD card having the OS preinstalled. You will find lots of blogs and tutorials about preparing an SD card for the Raspberry Pi. But if you are a beginner, you can simply download this free beginner’s guide eBook on pi: Raspberry Pi guide. This will show how to install the OS for the raspberry pi.
After setting up your SD Card, insert it into the raspberry pi. Next, for powering the pi connect your micro USB cable to it. Connect the keyboard & mouse to it, also connect your raspberry pi to the laptop via Wifi (search for your WiFi on the taskbar of the Pi) or an ethernet cable
Now, connect the HDMI display (the HDMI is only required for running the pi for the first time). Now power on your Pi, and follow the next steps to connect raspberry pi to laptop display.
STEP 2 : SHARING INTERNET.
STEP 2.1:
When connected to WiFi with Internet Access both the Pi and PC have been assigned IP Addresses automatically
STEP 2.2:
This step explains how you can share your laptop internet with the raspberry pi via Ethernet cable.
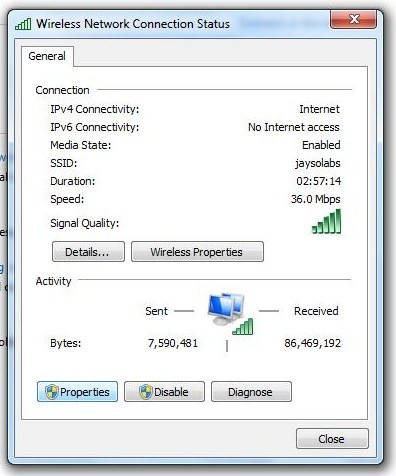
In Windows : For sharing internet to multiple users over Ethernet, go to Network and Sharing Center. Then click on the WiFi network:
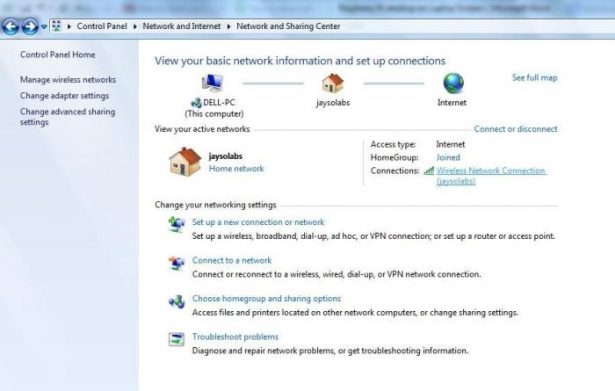
Click on Properties (shown below), then go to Sharing and click on “Allow other network users to connect”. Make sure that networking connection is changed to “Local Area Connection”:
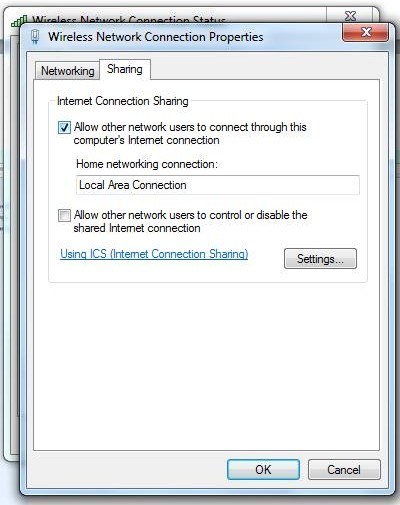
Note : Doing this will provide a dynamic IP to the Ethernet port of your laptop and other Devices connected to your laptop. Now, for checking the IP assigned to your laptop, click on the new local area connection link created:
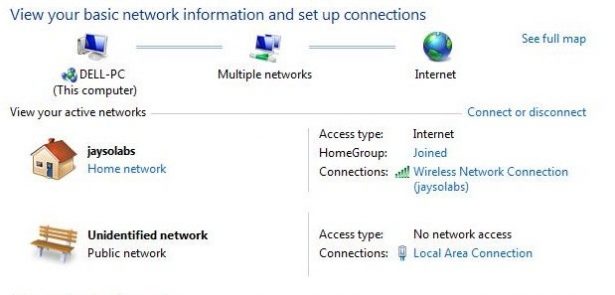
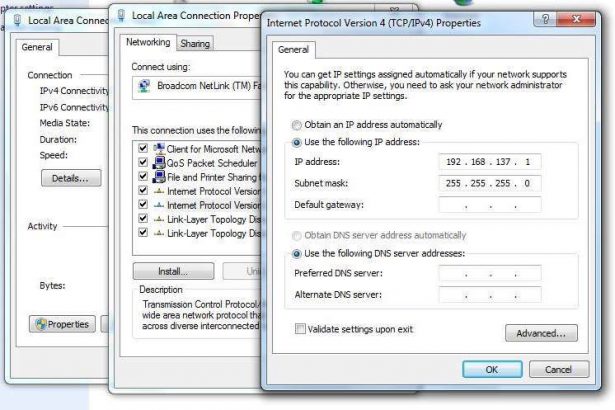
As shown above, the IP assigned to my laptop is 192.168.137.1. For checking the IP assigned to the connected ethernet device, do the following. Considering that IP assigned to your Laptop is 192.168.137.1 and subnet mask is 255.255.255.0 :
- Open command prompt.
- Ping on broadcast address of your IP. (Type) Eg: ping 192.168.137.255
- Stop the ping after 5 seconds.
- Check the reply from device: arp –a
STEP 3 : SETTING UP THE VNC SERVER TO CONNECT RASPBERRY PI TO LAPTOP DISPLAY
3.1: IF YOU HAVE AN HDMI DISPLAY:
Using the connected HDMI display on your pi, you should install VNC server in raspberry pi. Open the LX-Terminal and type the following commands to install VNC:
sudo apt-get update
sudo apt-get install tightvncserver
3.2: IF YOU DON’T HAVE AN HDMI DISPLAY:
- Install Adavance IP Scanner.
- Install Putty and run it
- Install RealVNC
- Once you are done open Advance IP Scanner, Click on the IP button to reset the IP Address Search Parameter and Press Search (Green Play button)
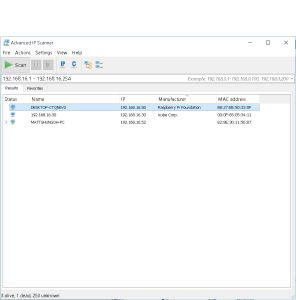
- If you are connected either by WiFi or Ethernet you should see the RaspberryPi Address, take note of it.
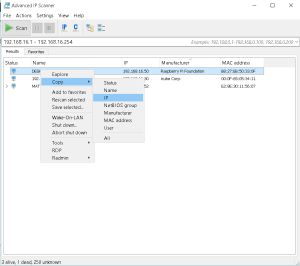
- Open Putty input the Raspberry Pi IP Address and use port 22.
- login with Default Username: pi and password: raspberryand a Terminal will appear, run this sudo codes.
- sudo apt-get update
- sudo apt-get install tightvncserver
3.3: STARTING VNC SERVER ON PI
For starting VNC, enter the following command in SSH terminal (with in Putty or Raspberry Pi GUI terminal)
vncserver :1
You will be prompted to enter and confirm a password. This will be asked only once, during first time setup. Enter an 8 digit password. Note that this is the password you will need to use, to connect to the Raspberry Pi remotely. You will also be asked if you want to create a separate “read-only” password – say no (n).
The VNC server is now running on your Pi and so we can attempt to connect to it. But first we must switch to the laptop, from which we want to control the pi. Then setup a VNC client to connect to the pi.
STEP 4 : SETTING UP THE CLIENT SIDE (LAPTOP)
Download VNC client from here and install it. When you first run VNC viewer, you will see following:
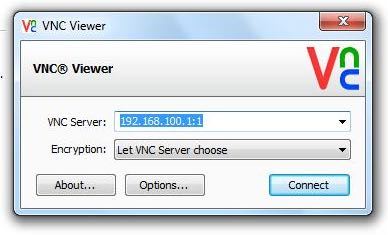
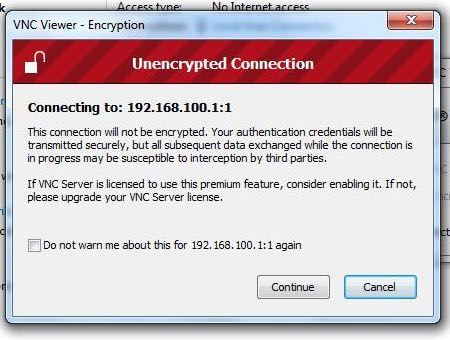
Enter IP address of your raspberry pi given dynamically by your laptop (you got the address from the earlier step). And append with :1 (denoting port number) and press connect. You will get a warning message, press ‘Continue’:
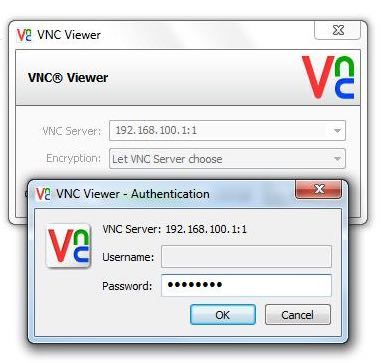
Enter the 8 digit password which was entered in VNC server installation on raspberry pi:
Finally, the raspberry pi desktop itself should appear as a VNC window. You will be able to access the GUI and do everything, as if you were using the pi’s keyboard, mouse and monitor directly. As with SSH, since this is working over your network, your pi could be situated anywhere as long as it is connected to your network.
STEP 5 : RUNNING VNC SERVER AT STARTUP IN RASPBERRY PI
Connecting to your raspberry pi remotely with VNC is fine as long as your pi does not reboot. If it does, then you either have to connect with SSH and restart the VNC Server. Else, arrange for the VNC Server to run automatically after the raspberry pi reboots. To ensure that VNC starts automatically each time on booting up, run the following commands on terminal:
Open “.config” folder from pi’s: user folder (it is a hidden folder).
Open “.config” folder from pi’s: user folder (it is a hidden folder).
cd /home/pi
cd .config
Create folder called “autostart” in it. Also create file called “tightvnc.desktop” in that folder. To create file you can use any known text editor. Here I used Sudo Nano function for this:
mkdir autostart
cd autostart
sudo nano tightvnc.desktop
Edit the contents of file with the following text and save the file:
[Desktop Entry]
Type=Application
Name=TightVNC
Exec=vncserver :1
StartupNotify=false
Now next time you reboot your Pi, vncserver will start automatically. And seamlessly would connect raspberry pi to laptop display.
So, whenever you want to do something with your pi, just connect it to the WiFi (it should remember a pre-existing Network) or connect via ethernet cable to your laptop or turn and power it. Then open VNCViewer, mention the IP address of your pi. And you can use the display of your laptop as the raspberry pi’s monitor
Remember if you change Wifi Networks rember to fin the Raspberry Pis IP address because VNC will refuse the connection unless you use the update dated Address, this is because the Pi gets an Address via DHCP which means the address change all the time over different networks.
Credit of this post goes to: