
Hello fellow makers and tinkerers, I am back with another simple, easy-to-follow project based on the Raspberry Pi Pico. Using easy-to-find components, we will be making a 2-wheel drive the motor car controlled through a Bluetooth module on an android APP made by MIT app inventor.
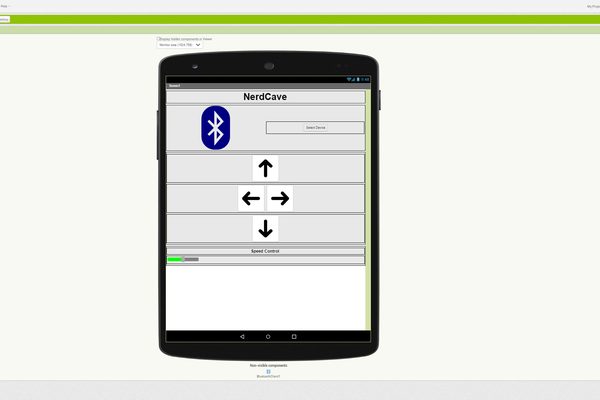
The application is straightforward, which allows you to connect to the car through Bluetooth. Once connected, you can use the arrow buttons to control the movement and direction of the car. It comes with a slider to control the speed of the motor.
In this instructable, we will go through everything for you to recreate this project, make something similar, expand on it, and make it more awesome.
I would appreciate if you go watch the video I have made for the project. YouTube
Supplies
To make this instructable as detailed as possible, I will include links from AliExpress; these are not affiliated links but will guide you on where to start. You might already have some of the components, or possible to change them to other components. If you need help, let me know in the comment section.
Feel free to change parts as needed depending on what you have available.
For the wood, it might be that you do not have access to a laser cutter, but online services provide laser cutting, or the enclosure can be 3D printed or made out of cardboard. The enclosure is limited to your creativity.
– Raspberry Pi Pico + Header Pins + Cable – AliExpress
– L298N Motor Driver Controller Board – AliExpress
– 2 x 18650 Battery Storage Box Case – AliExpress
– DC Electric Motor with Plastic TT Motor Tire Wheel – AliExpress
– Male-Female , Male-Male jumpers – AliExpress
– Single Wheel Light Duty Swivel Plate – AliExpress
– Nuts and Bolts Assortment Kit – AliExpress
– Electrical Cable Connectors CH2 – AliExpress
– 1 * 2m – 20 AWG single core wire – AliExpress
Material:
3mm Plywood
Equipment:
Ortur 2 Laser Master
Tools:
Soldering Iron, Wire stripper/cutter, Screwdriver, Glue
Optional:
3D printer, tools for cutting cardboard or wood if laser cutter is not used.
Note:
The above should be used to guide what will be needed to complete this project or make something similar.
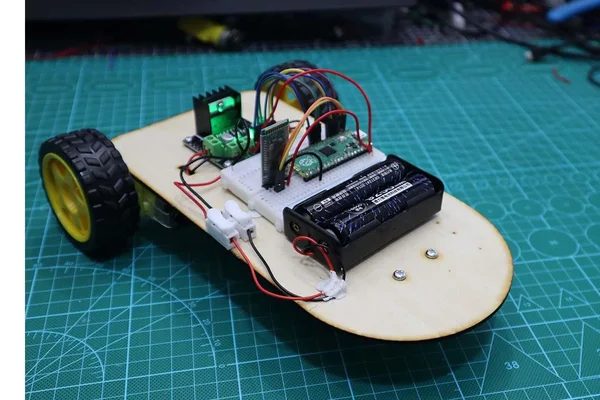
Step 1: Car Chassis + Motors
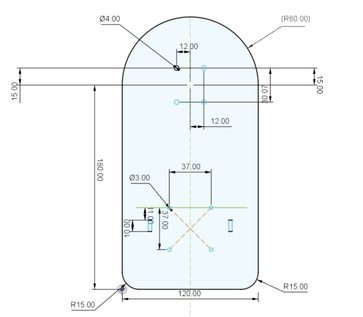
The car chassis is made in Fusion 360. The swivel wheel, along with the L298n, will be mounted using nuts and bolts.
The SVG file can be downloaded here or the DXF file from the following GitHub repository.
For the DC motors, you have to solder wires on the terminal and use a hot glue gun to secure the motor to the base. The wires can be fed through the hole to be connected to the motor driver, which will be shown in step 2.
The connection of the wires to the terminals does not matter as we can either change them when connecting it to the L298N or change it in code since we can control the rotation and speed of the motor.
Step 2: Schematic and Components Overview
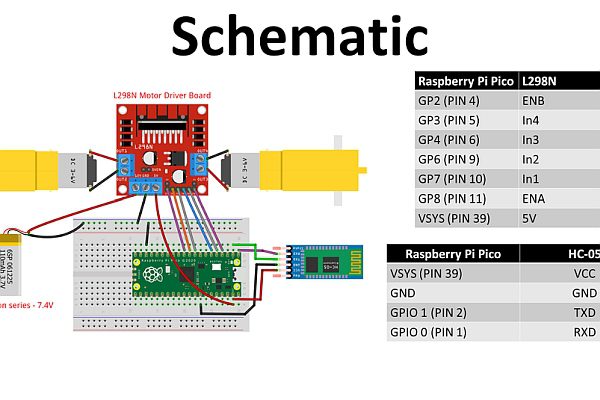
This schematic diagram for this project is given above. You can change the pins being used on the Pico if needed, which you will have to update accordingly in the code section. The Pico has 26 multipurpose GPIOs (general-purpose input/output), which for our application is perfect since we only need six inputs to control the L298n and two pins using the UART0 protocol on the Pico board. The pinout of the Pico is given above.
L298n Motor Driver
The L298n is a dual H-Bridge motor driver which allows speed and direction control of two DC motors at the same time. The module can drive DC motors that have voltages between 5 and 35V, with a peak current up to 2A. In the project I decided to use 2 – 3.7 Li-ion 18650 Batteries in series delivering 7.4V in total. There are an average voltage drop of 2V on the module so the output to DC motor will vary.
HC-05 Bluetooth Module
HC-05 Bluetooth Module is an easy to use Bluetooth SPP (Serial Port Protocol) module, designed for transparent wireless serial connection setup. Its communication is via serial communication which makes an easy way to interface with controller or PC
Note:
After making all the connections, we need to have the power disconnected from the battery and remove the 5V from the motor driver before we plug the Pico into the computer through the USB. After uploading all the code, it can be plugged in again.
Step 3: Installing MicroPython
Start with your Pico unplugged from USB. Hold down the BOOTSEL button, and while continuing to hold it (don't let go!), plug the Pico into USB. A short GIF above illustrates this step. Continue to hold the BOOTSEL button until the RPI-RP2 drive appears.
Drag the rp2-pico-20220117-v1.18.uf2 file to RPI-RP2.
Alternative method will be using Thonny to install MicroPython. If you are completely new to the Raspberry Pi Pico do not fear there are many videos and tutorials on getting started and I have included a tutorial here which you can find on my YouTube channel (Link).
Step 4: Code Explanation Pico
Now that you have made all the necessary connections. We can program Pico. All the code for this project is available on GitHub. We will cover the code on the Pico first, then look at the Android Application.
We start by importing all the libraries and modules we need.
from machine import Pin,PWM,UART #importing PIN and PWM
import time #importing time
We can set up our Baud rate (The baud rate is the rate at which information is transferred in a communication channel.)
#Defining UART channel and Baud Rate
uart= UART(0,9600)
We set up all the pins connected to the L298n motor driver in this code block. We define the frequency of our PWM and set the maximum cycle of 65025, which we will control with a thumb slider on our App.
#OUT1 and OUT2
In1=Pin(6,Pin.OUT) #IN1
In2=Pin(7,Pin.OUT) #IN2
#OUT3 and OUT4
In3=Pin(4,Pin.OUT) #IN3
In4=Pin(3,Pin.OUT) #IN4
# Set PWM
EN_A=PWM(Pin(8))
EN_B=PWM(Pin(2))
# Defining frequency for enable pins
EN_A.freq(1500)
EN_B.freq(1500)
# Setting maximum duty cycle for maximum speed (0 to 65025)
EN_A.duty_u16(65025)
EN_B.duty_u16(65025)
We then create five functions to control the movement and direction of the car in which we control the pins to either be high or low. This will control the direction the motor is turning in. If your robot does not turn in the right direction you either have to swop the cables from the motor to the L298n driver or change the high and low in the code below.
# Left
def turn_left():
  In1.high()
  In2.low()
  In3.low()
  In4.high()

# Right
def turn_right():
  In1.low()
  In2.high()
  In3.high()
  In4.low()

# Backward
def move_backward():
  In1.low()
  In2.high()
  In3.low()
  In4.high()

# Forward
def move_forward():
  In1.high()
  In2.low()
  In3.high()
  In4.low()

# Stop
def stop():
  In1.low()
  In2.low()
  In3.low()
  In4.low()
In our main loop, we constantly check the Bluetooth to see what button is pressed by looking at the data received from our App once the button is pressed. The relevant function will be executed depending on the data received through Bluetooth. We also check what the speed is set at, and if nothing is being sent through, the default function is called will be stopped.
while True:
  if uart.any(): #Checking if data available
    data=uart.read() #Getting data
    data=str(data) #Converting bytes to str type
    print(data)
    if('forward' in data):
      move_forward() #Forward
    elif('backward' in data):
      move_backward() #Backward
    elif('right' in data):
      turn_right() #Turn Right
    elif('left' in data):
      turn_left() #Turn Left
    elif('stop' in data):
      stop() #Stop
    elif('E' in data):
      speed=data.split("|")
      print(speed[1])
      set_speed = float(speed[1])/100 * 65025
      EN_A.duty_u16(int(set_speed)) #Setting Duty Cycle
      EN_B.duty_u16(int(set_speed)) #Setting Duty Cycle
    else:
      stop() #Stop
This is all the code needed for the Pico; now, we need to create a simple mobile App, and we will be using MIT App inventor to make an android application.
Step 5: Android App (MIT App Inventor)
MIT App Inventor is a web application integrated development environment originally provided by Google, and now maintained by the Massachusetts Institute of Technology.
We create a simple interface where you can connect to the Bluetooth module by selecting a device and have the buttons to control the movement and the slider for the speed.
For the blocks, we check what button is pressed, and depending on which button is, we will send a text which our Pico will execute by calling the correct function to control the car. If we let go of the button, it will call the stop function.
Once the App is on your phone, connect to the robot car and have some fun.
I have included the original .aia file in case you want to change the App and make your changes, and the apk if you want to use the App as is.
Step 6: Conclusion and Improvement
No project is ever complete, and there are so many things we can add, like sensors and modules to improve the car. I hope you find it helpful, and if you need any help, just let me know in the comment section below. I will be making a PCB for this project in the future.