
This instructable is all about monitoring the state of relays using a Raspberry Pi. In the particular case we will have a look at a sophisticated Telegärtner DoorLine Pro intercom which holds two voltage-free relays. Normally, those are used to trigger an electric door strike or a doorbell but together with a Raspberry Pi can be used to send out Twitter messages.

So, why would you possibly need a tweeting intercom? – Well, first of all you are not limited to sending tweets only. Theoretically, you could kick off any Raspberry Pi project so you are only limited by your creativity 😉 We chose to go for tweeting since the DoorLine Pro intercom comes with an integrated motion sensor which can be configured to trigger the two available relays. Imagine you are away from home and someone tries to break into your house: The intercom motion sensor would trigger the relay, the Raspberry Pi would detect the state change and take a picture tweeting it alongside an alert message and time-stamp.
If your intercom is equipped with a touchscreen featuring a code-lock function (like the DoorLine Pro does) you could also install it at the front door of your super secret server farm. Whenever someone types in the (correct) PIN triggering the door strike, the Raspberry Pi would take a picture/video and log the activity.
Of course, you could also do it just for fun and trigger fireworks / smoke machine / trap door etc. 🙂
This instructable will work with any intercom equipped with relays but to get the most out of it the intercom should contain enhanced features like a motion sensor, code lock function or an integrated telephone system.
Step 1: Needed Hardware
The setup which we built for the sake of the review is quite complex since the Telegärtner DoorLine Pro intercom is connected to either a telephone system or a WiFi router with analogue extension and therefore requires additional hardware for configuration. The advantage of this setup is the possibility to assign a VoIP number and trigger the relay from anywhere around the globe.
For the very basic setup (monitoring the state of a voltage-free relay without utilizing any doorbell/door strike at the same relay) the following hardware is required:
- Intercom (w/ voltage-free relay contacts)
- Raspberry Pi (w/ internet connection if you wish to send out Tweets)
- a couple of male-female jumper wires
For the advanced setup you additionally need:
- some more wires
- electric door strike or doorbell
- Raspberry Pi camera module (only in case you'd like to take pictures as well)
- soldering iron
- 12V AC or DC power supply
- 1 x rectifier (if AC PSU used)
- 1 x 12V to 3.3V step-down converter
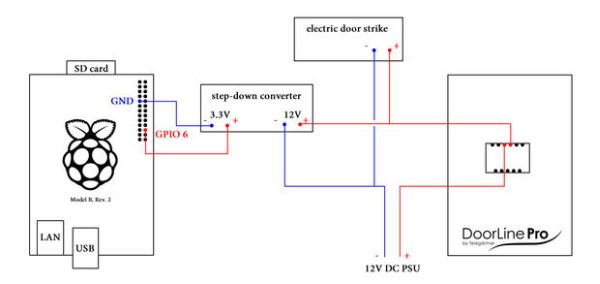
Step 2: Wiring: basic setup
That's the easy part considering you don't want to switch a doorbell or a door strike via the same relay: Just connect the 3V3- and the GPIO 6 pin with the relay contacts as shown in the wiring diagram above.
Note: In this experiment we didn't utilize a door strike / doorbell at the same relay which would require a voltage being applied. Hence, a rectifier (if using an AC PSU) and a step down voltage converter would have to be interposed in order to not damage the Raspberry Pi. We will show you this setup in the next step 😉
For more detail: The Tweeting Intercom: (Door Strike) Relay Monitoring w/ Raspberry Pi