
http://www.beatsbydre.com/speakers/beatbox-portable-usb/beatbox-portable-usb,default,pd.htmlIt’s a cool product, don’t get me wrong, but I’m not really down to pay $400+ tax for some fancy looking speakers (which don't even give you rechargeable batteries, by the way). So I decided to set off to replicate the functionality without the hefty price tag.
OBJECTIVE: To create a Raspberry Pi that automatically boots into the command line and becomes discoverable via Bluetooth. Any Bluetooth-enabled device with the A2DP (Advanced Audio Distribution Profile) support will be able to push audio to the Pi through its Analog (default) or HDMI speaker output. When a Bluetooth device connects, the PI routes the connection through to Pulse audio and Bluetooth discoverability is turned off. The audio should play seamlessly from here. You can then disconnect your device (likely a smartphone) and the PI will become discoverable again via Bluetooth and another device is free to connect. The default pass key will be 0000 but most devices input this automatically so it should be hassle free!NOTE: I did find that a lot of other people in the Linux community have attempted to do the same thing to their PI but not as successfully as I have! My setup allows the device to run headless (without a monitor) from boot and any Bluetooth device can connect and disconnect without an issue. I’ve seen a lot of other people with tutorials that make you login via command line first or login to the desktop and setup the Bluetooth connection manually. LAME! The goal of this is to be as similar to a *product* as possible. 🙂 enjoy!
NOTE: This tutorial assumes you have a fair amount of Linux/command-line knowledge. I won’t be explaining basic commands or ideology so if this is above your head find a friend!
What is the Raspberry PI?
The Raspberry Pi is a credit-card sized computer that plugs into your TV and a keyboard. It’s a capable little PC which can be used for many of the things that your desktop PC does, like spreadsheets, word-processing and games. It also plays high-definition video. –Raspberry PI website
You can learn more about the PI and how to get one, here:
http://www.raspberrypi.org/
Requirements
• Raspberry Pi
• Bluetooth v4.0+ micro USB dongle
• 4GB SD Card
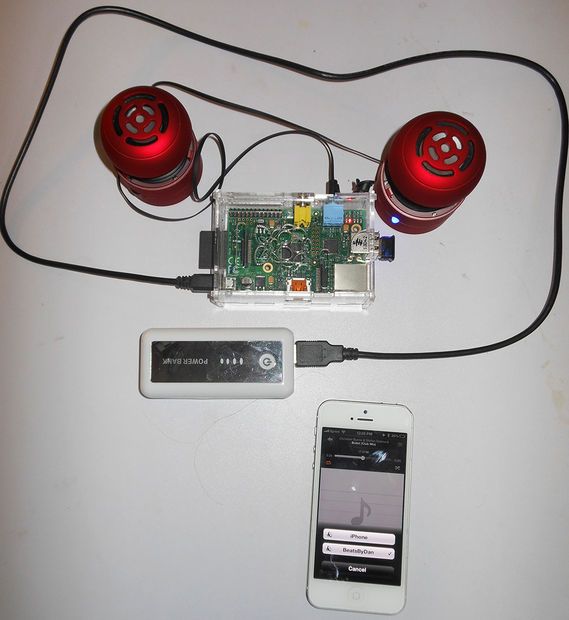
Requirements for [portable audio]
• Battery-powered speaker(s)
• Battery pack for Raspberry Pi
• Enclosure to keep everything in
Step 1: Prepare SD for base Operating System
Go ahead and pop in your SD card into your card reader. For this setup we will be using Raspbian Wheezy, which is the latest Debian based OS for the PI at the time of this writing. You should be able to find the latest version here:
http://www.raspberrypi.org/downloads
Download and uncompress the image file and note the location. If you’re using a Mac it should be trivial to burn the image to the SD card. If you’re a Windows user however, go ahead and use this utility to “burn” the IMG file to the SD card.
http://sourceforge.net/projects/win32diskimager/
Make sure you select the right file and the right drive letter before hitting the WRITE button or you could have some nasty things happen.
Step 2: Login to the PI through a monitor/keyboard or network SSH
Your PI will need to be connected to the Internet at this point, either through a LAN or a WiFi connection. I won’t be covering how to connect your PI to WiFi or login from SSH; Google is your friend!
Otherwise use a keyboard and a monitor and setup your PI the old fashion way!
NOTE: Make sure your Bluetooth dongle is plugged from here on.
NOTE: The default login is pi and the password is raspberry.
Step 3: Install prerequisite packages
Okay now that we’re all logged, connected to the Internet, and ready to go let’s go ahead and install all the packages so that Bluetooth can be utilized on your PI.
sudo apt-get upgrade
sudo apt-get install bluez pulseaudio-module-bluetooth python-gobject python-gobject-2 bluez-tools
Step 4: Modify some config files to enable our Bluetooth environment
First, let’s go ahead and add our user pi to the Pulse audio group so we the user can play audio through it.
sudo usermod –a –G lp pi
Now, let’s go ahead and enable A2DP in our Bluetooth configuration. Run the following command:
sudo nano /etc/bluetooth/audio.conf
This will open the text editor nano with that config file. Add the follow text under [General]:
Enable=Source,Sink,Media,Socket
Hit CTRL+O and ENTER to save and then CTRL+X to exit nano. Next, let’s modify the Pulse daemon configuration file to change its resampling method.
sudo nano /etc/pulse/daemon.conf
Look for the following line: resample-method = speex-float-3
If the line doesn’t have a ; in front of it, please put a ; there so it looks like:
; resample-method = speex-float-3
And then add the following line underneath that.
resample-method = trivial
Before moving on, let’s also go ahead and rename our Bluetooth device (odds are you don’t want the name to be raspberry-pi0) as well as redefine the Bluetooth class device from ‘Computer' to ‘Portable audio device'. There are two locations you should modify.
sudo nano /etc/bluetooth/main.conf
Change the Name parameter. I chose to do a play on the BeatsByDre.
Name = BeatsByDan
Change the device's Class parameter.
Class 0x20041C
Next, you’ll have to modify the config of your specific device. The directory is based on your Bluetooth device’s MAC address so just hit TAB when typing that out and you’ll find yours.
For more detail: Turn your Raspberry Pi into a Wireless Portable Bluetooth Audio System A2DP