
Startle your guests who do not have an entrance permit (RFID tag) and get notified w/ WhatsApp messages without checking the door 🙂
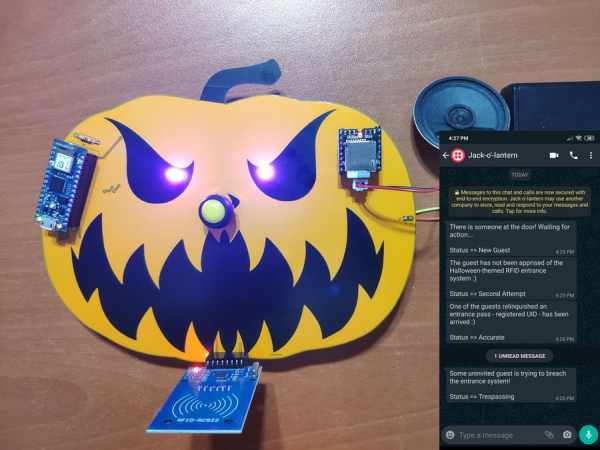
Despite the fact that making a hilarious yet not deceitful joke with a jack-o'-lantern on Halloween night is not unobtrusive, I decided to create an exceptional event for my guests on Halloween when they ring the doorbell by designing a jack-o'-lantern doorbell with intriguing features. And, not surprisingly, I only let some of my closest friends know about my new doorbell features by giving them registered RFID tags (entrance permits) to make my other guests frightened even a little bit 🙂 In detail, this doorbell talks to the guests and informs the user via WhatsApp when the guests ring the doorbell or show RFID tags or cards.
First of all, to make the doorbell talking with the guests after an interaction, I generated voices from texts for each occasion I wanted the doorbell to talk. You can get more information about how to create voice files over text files in the following sections.
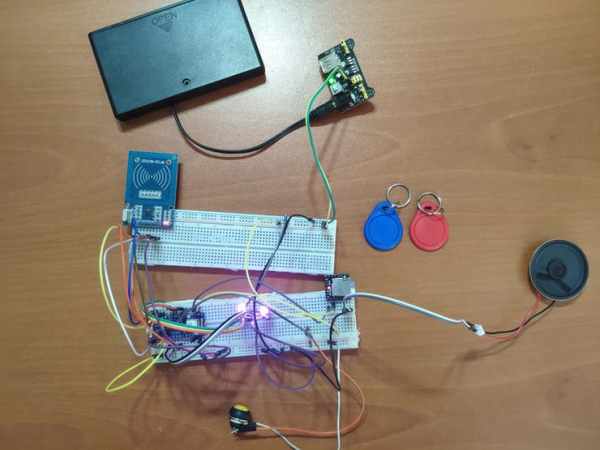
To be able to get notified via WhatsApp after an interaction, I created an application on the Raspberry Pi, including Twilio's API for WhatsApp. And, I utilized an Arduino Nano 33 IoT to communicate with the application on the Raspberry Pi.
Then, to play the voices I generated with the Arduino Nano 33 IoT, I used a DFPlayer Mini MP3 Player with a speaker. And, to read and register UIDs from RFID tags or cards, I used an MFRC522 RFID Reader.
Finally, I included a DC184 Yellow Pushbutton as the doorbell button and RGB common cathode LEDs as the eyes of the jack-o'-lantern.
After completing my design on a breadboard and testing the code, I designed a PCB (WhatsApp RFID Talking Doorbell) with a unique jack-o'-lantern shape with an angry facial expression to create a suitable and wicked doorbell for Halloween 🙂
Huge thanks to PCBWay for sponsoring this project.
Step 1: Designing and Soldering the WhatsApp RFID Talking Doorbell PCB
I tested all connections and modules with the Arduino Nano 33 IoT on the breadboard.
Then, I designed the WhatsApp RFID Talking Doorbell PCB by using KiCad. I attached the Gerber file of the PCB below, so if you want, you can order this PCB from PCBWay to create a stylish jack-o'-lantern to frighten your guests who were not informed about its cursed features 🙂
Click here to inspect and order this PCB directly on PCBWay.
First of all, by using a soldering iron, I attached headers (male and female), 5mm RGB common cathode LEDs, 1K resistor, 10K resistor, and DC184 yellow pushbutton.
Component list on the PCB:
A1 (Headers for Arduino Nano 33 IoT)
D1, D2 (5mm RGB Common Cathode LED)
J1 (Headers for MFRC522 RFID Reader)
J2, J3 (Headers for DFPlayer Mini)
J4 (Headers for Speaker)
P1 (Headers for Power Supply)
R1 (1K Resistor)
R2 (10K Resistor)
SW1 (DC184 Yellow Pushbutton)
Step 2: Setting up a LAMP web server on Raspberry Pi
If you are a novice in programming with Raspberry Pi, you can inspect well-explained instructions and tutorials on the official Raspberry Pi website.
To go to the official Raspberry Pi setting up tutorial, click here.
- Open a terminal window by selecting Accessories > Terminal from the menu.
- Install the apache2 package by typing the following command into the terminal and pressing Enter:
sudo apt-get install apache2 -y
Source: WhatsApp Halloween-Themed RFID Talking Doorbell w/ RGB Eyes