
In this brief guide we will show you how to connect up two LEDs to the GPIO ports on your Raspberry Pi and control them via Python Script. From this point onwards I will assume that your Raspberry Pi has a fully working install of Raspbian and is connected to your WiFi or Wired Network. Rather than working directly on the Pi I will be connecting via SSH to create and execute our code.
 You may be wondering why we are bothering tinkering around with LEDs rather than diving straight in and getting some motors up and running. There are two reasons for this the first is I am still waiting for my L298N motor Controller to arrive. The second reason is that the basic Python code we will be using to light a few simple LEDs will be pretty much the same code we will be using to turn a motor on and off.
| Amount | Part Type | Properties |
|---|---|---|
| 1 | Red LED | package 5 mm [THT]; color Red; leg yes |
| 1 | Green LED | package 5 mm [THT]; color Green; leg yes |
| 2 | 270Ω Resistor | package THT; tolerance ±5%; resistance 270Ω; pin spacing 400 mil; bands 4 |
| 1 | Raspberry Pi B rev1 | processor Broadcom SoC BCM2835 ARMv6; variant Raspberry Pi B(Rev 01) |
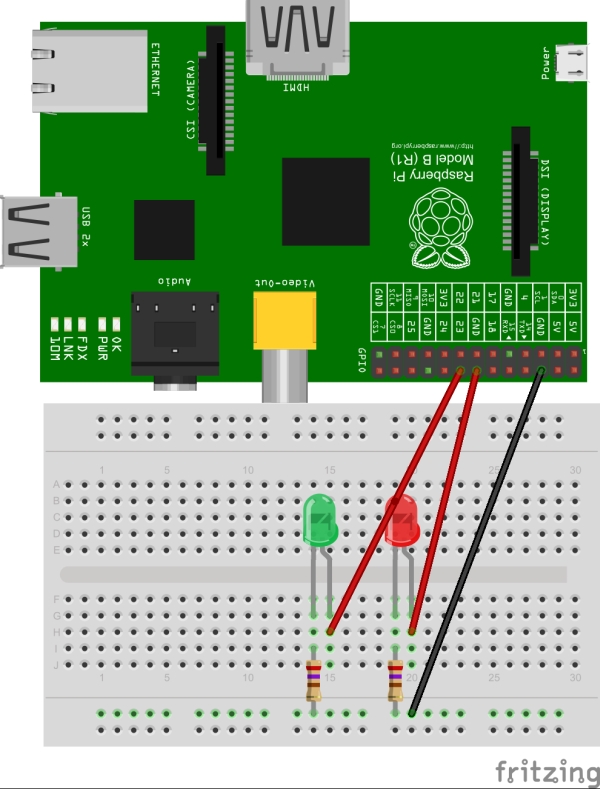
Connect the Ground (Black cable) to the Ground connector on the Raspberry Pi GPIO, this is the third pin down on the side nearest your breadboard. Plug both LEDs and resistors into the breadboard as shown and the connect the live (or signal cables) to GPIO pins 16 (for the Red LED) and 18 (for the Green LED). Once that is complete connect the live cables into the slot below the longer leg (Positive) of each LED as shown. If everything looks exactly like it does in the diagram then it is time to move onto the coding part of this guide.
For more detail: Raspberry Pi Robot – Flashing LEDs – The Circuit